Welcome to onboarding!
To help you get started, here is a 4-step guide with 2 videos to discover the Follow Lab PRO platform and start on the right foot. Follow the guide and you will know everything about Follow Lab PRO. You can also book a getting-started session with our team.
Getting started videos
Step 1: Set up a new coaching engagement (2 min)
Create my first coaching engagement
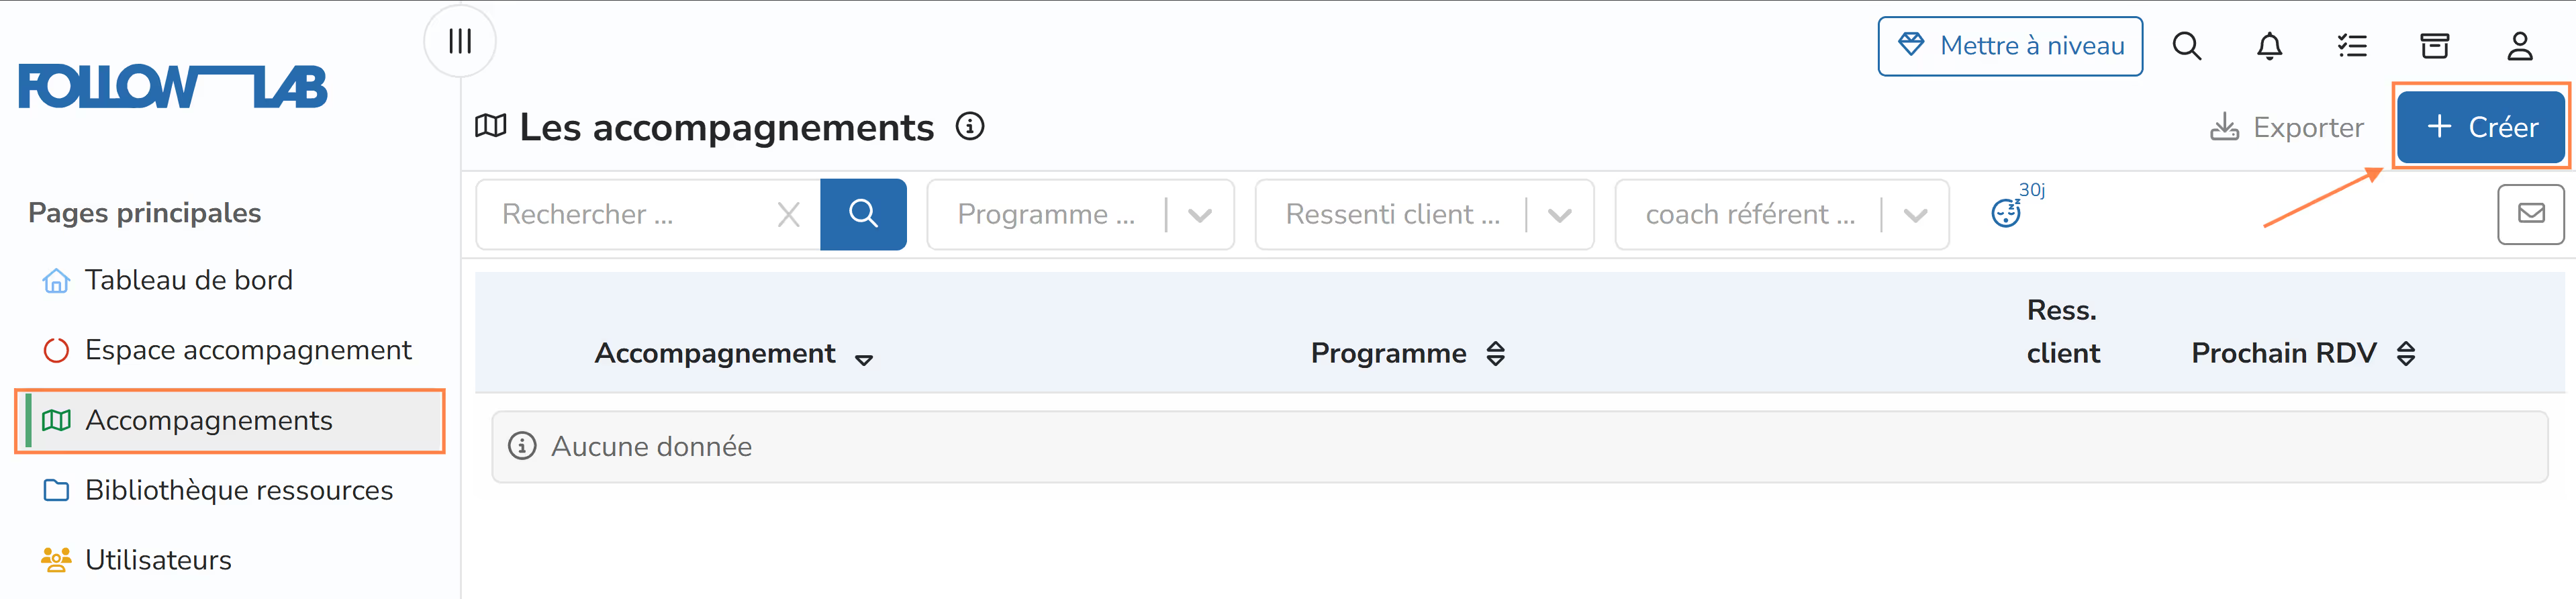
I go to the active engagements page and click create.
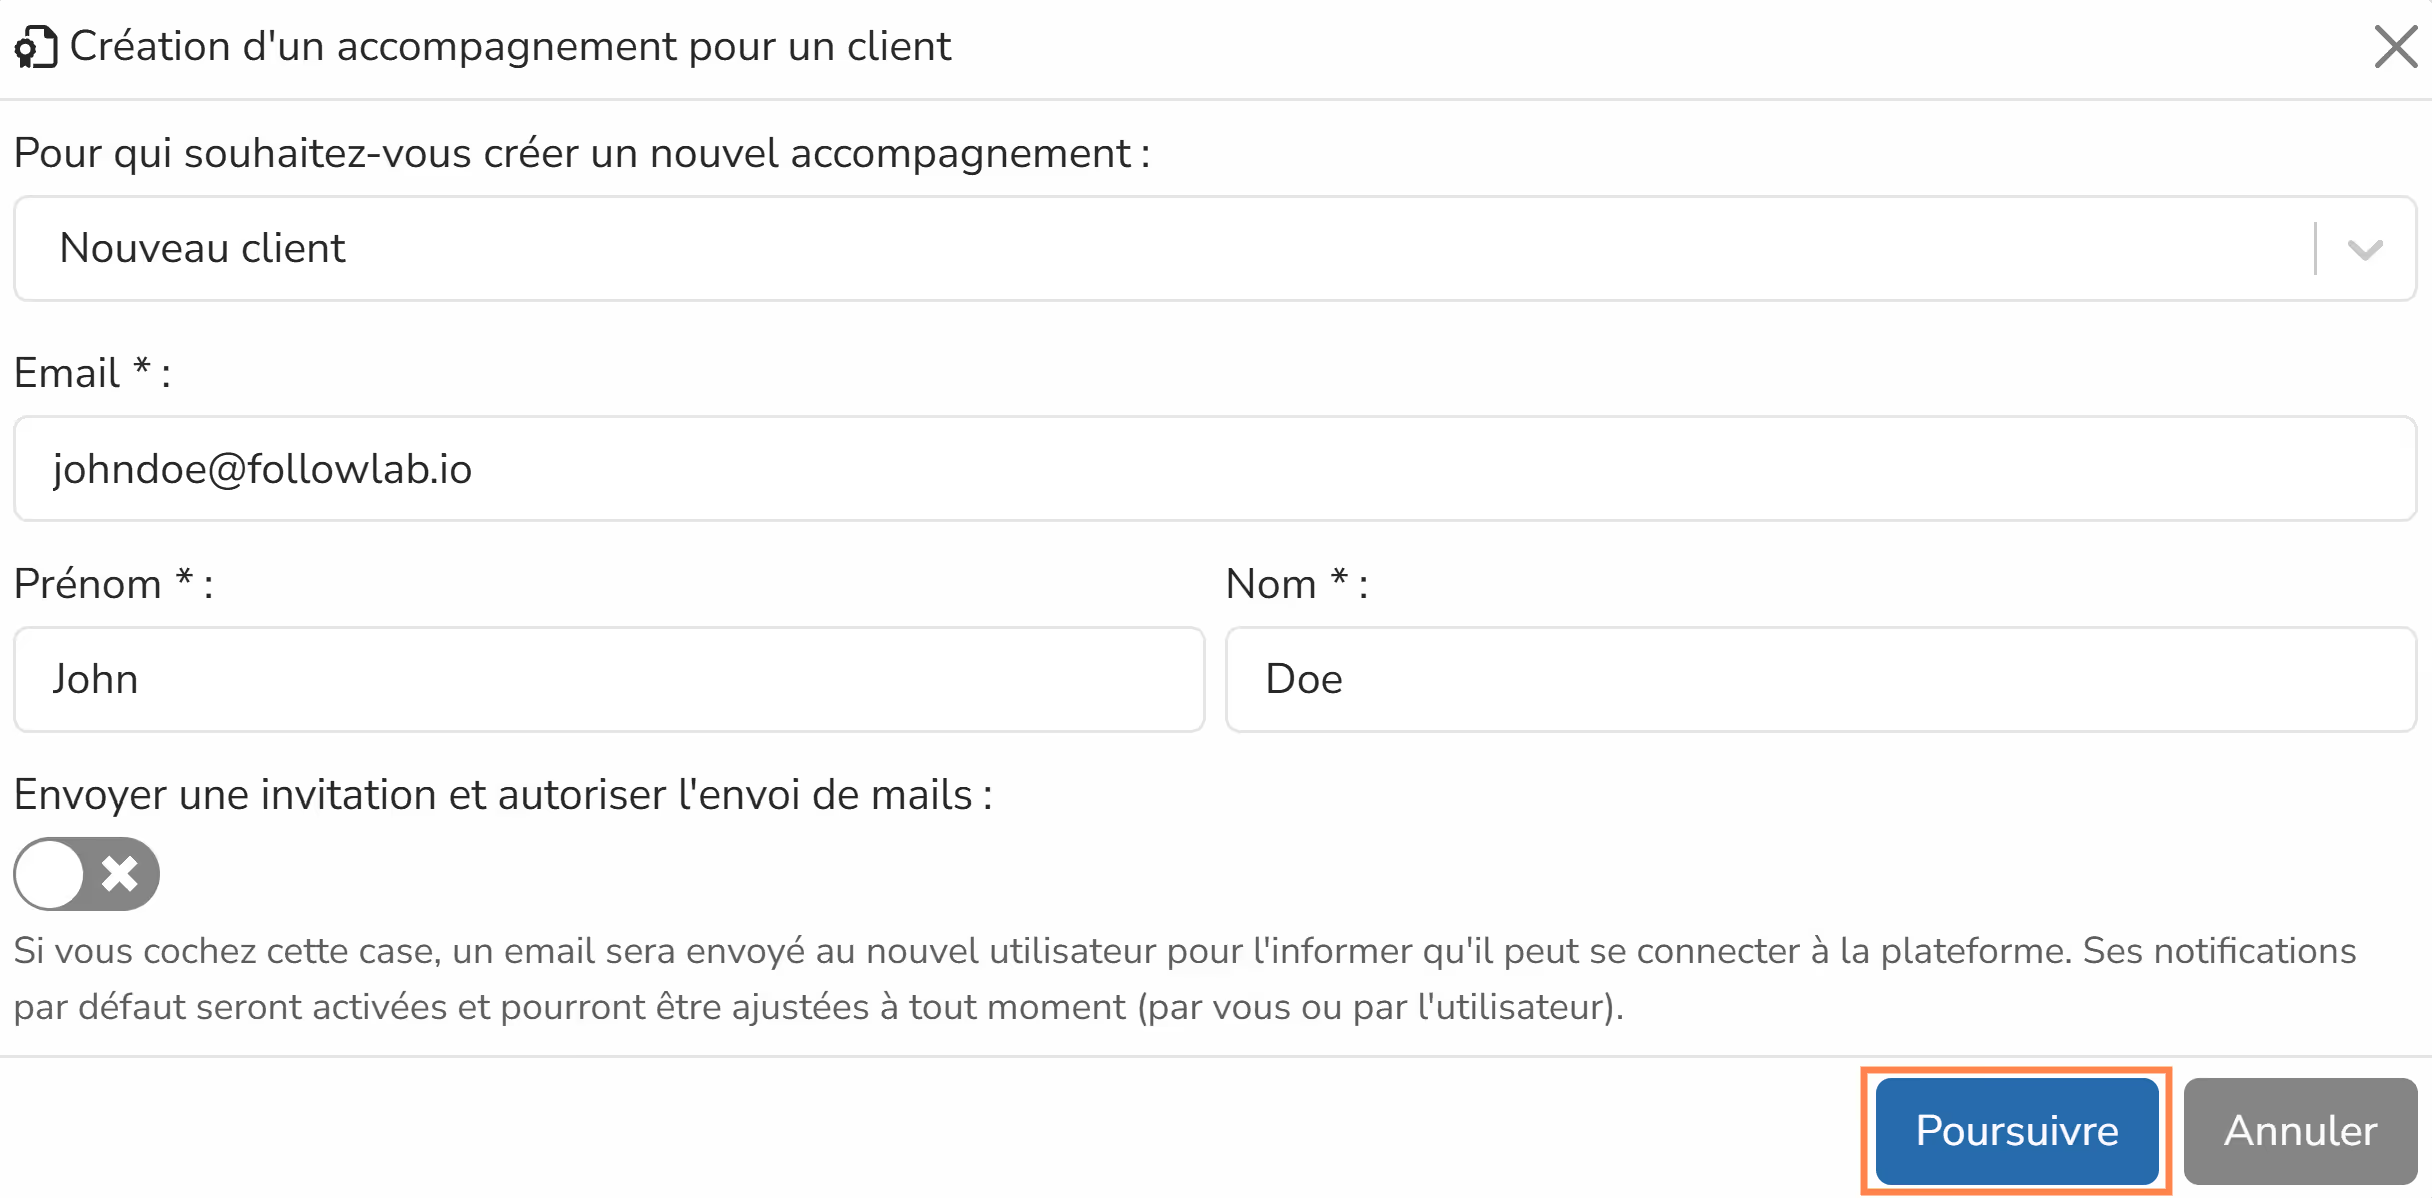
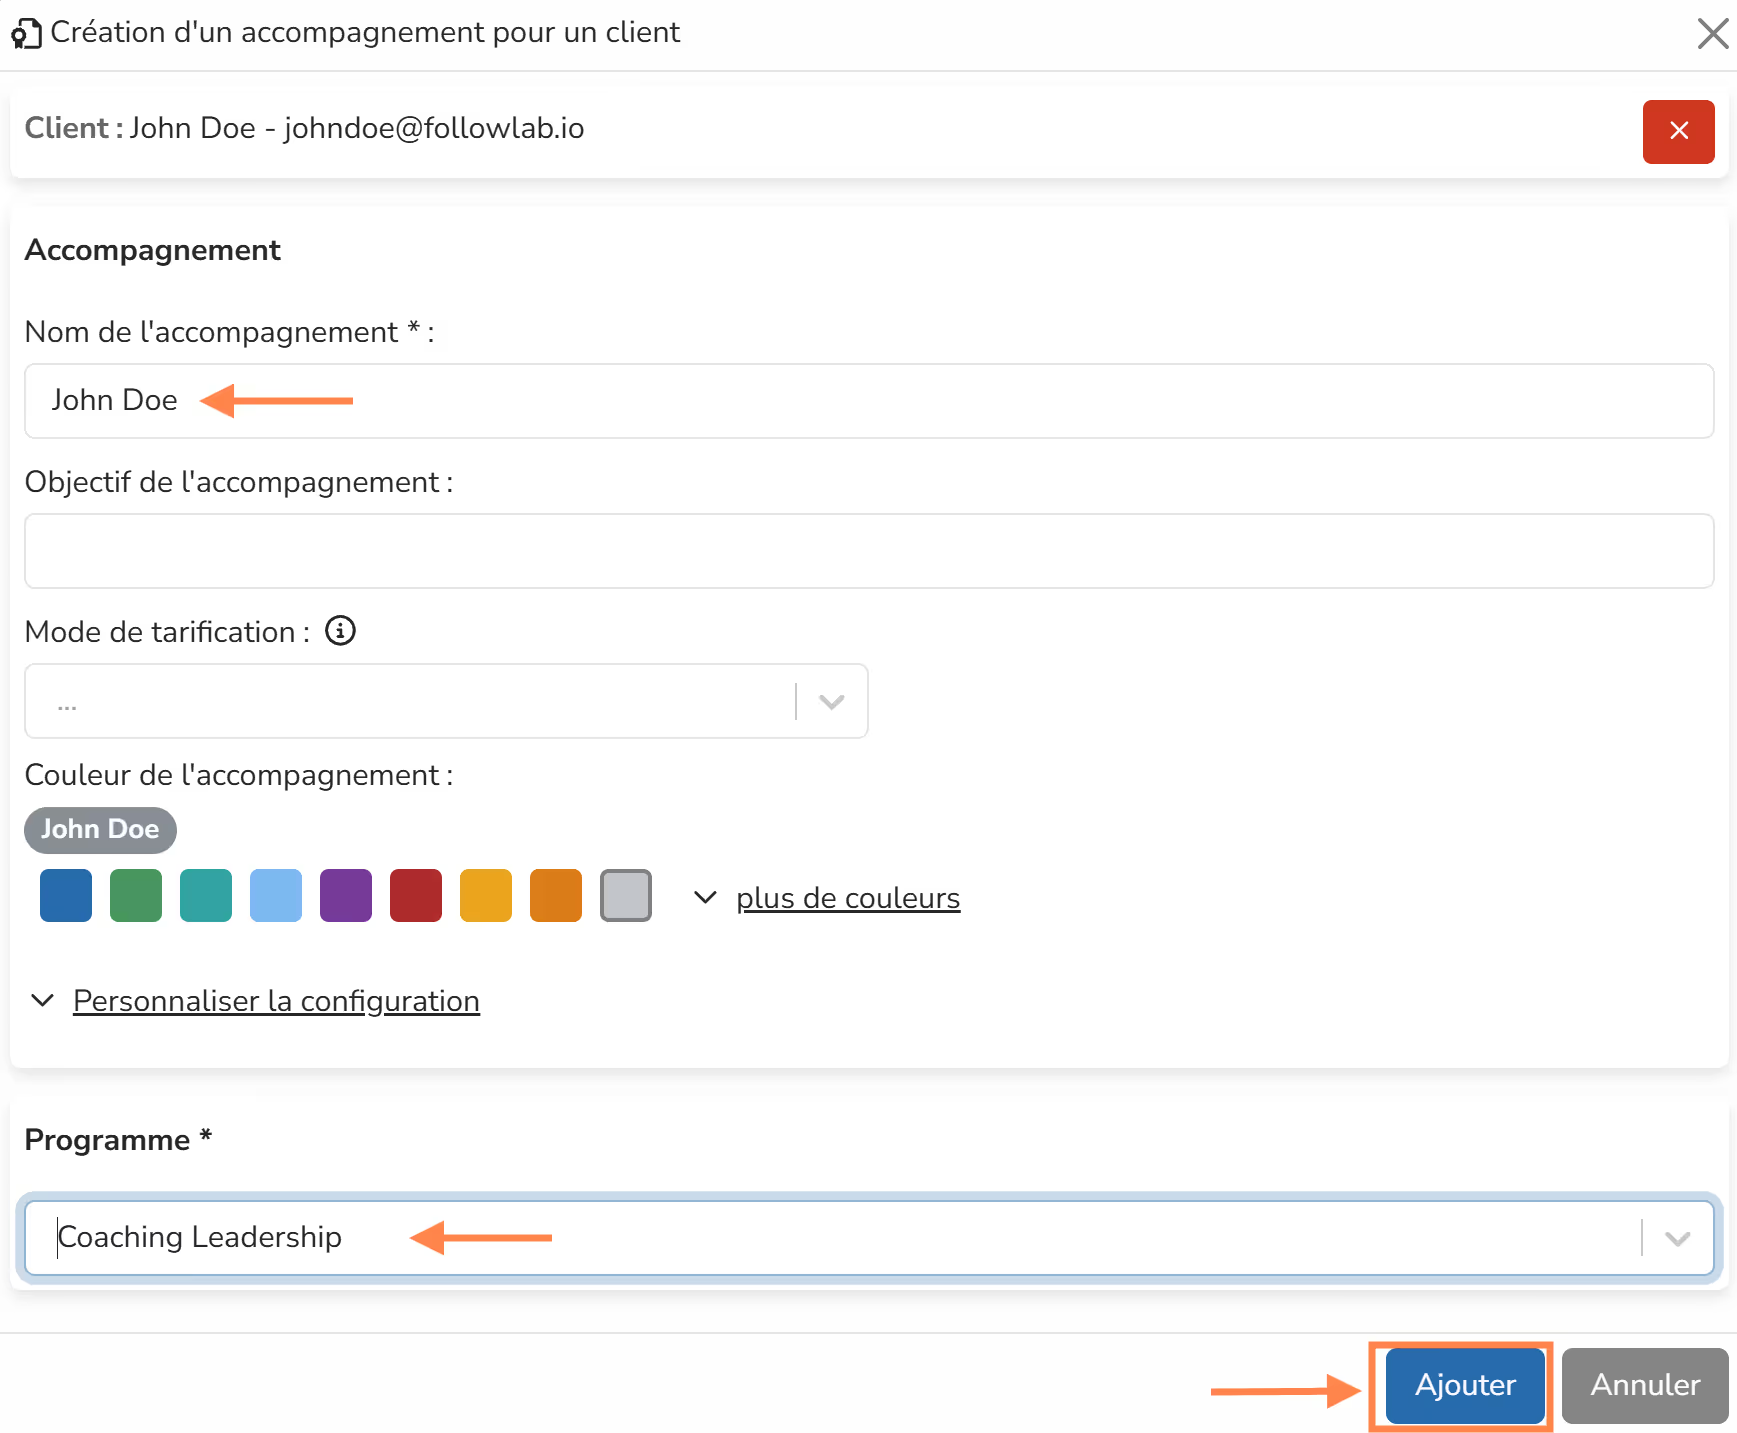
I choose new client and complete the form with the contact details of the client I want to associate with this engagement.
Tip: To test for the first time, I can enter a personal email. This lets me see what the client receives and what they have access to.
If I check send an invitation and authorize email sending, the client will immediately receive an email informing them that they can log in to Follow Lab.
I can optionally change the name of this engagement.
IMPORTANT
By default, the engagement name is prefilled with the client's first and last name.
This is the simplest option in most cases.
However, client and engagement are different.
On Follow Lab:
- a client can be followed in different engagements.
- an engagement can involve several clients (for example, for couple coaching, or a minor and their parent)
I can enter the engagement objective now, or do it later with my client.
I now choose my program.
Depending on my program settings, a list of sessions will then be automatically available for this new engagement.
IMPORTANT
Once the engagement is created, you cannot change its program.
Later, if your client is followed under another program, you will need to add a new engagement for them.
I save, and I'm done!
Step 2: Use the coaching engagement space (15 min)
1. Access the coaching engagement space
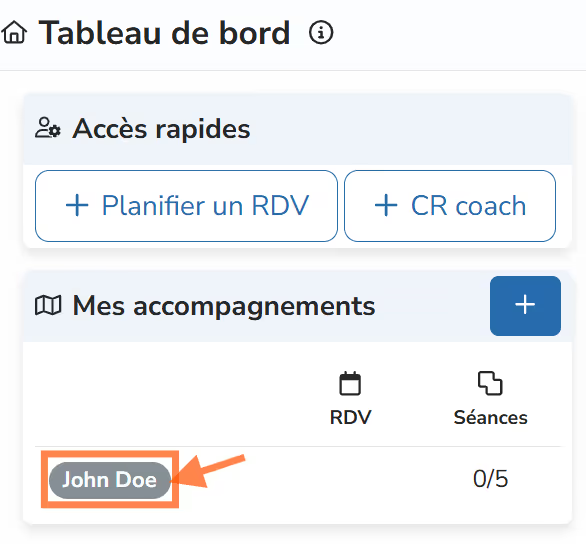
From my dashboard, I click on the name of the engagement I just added.
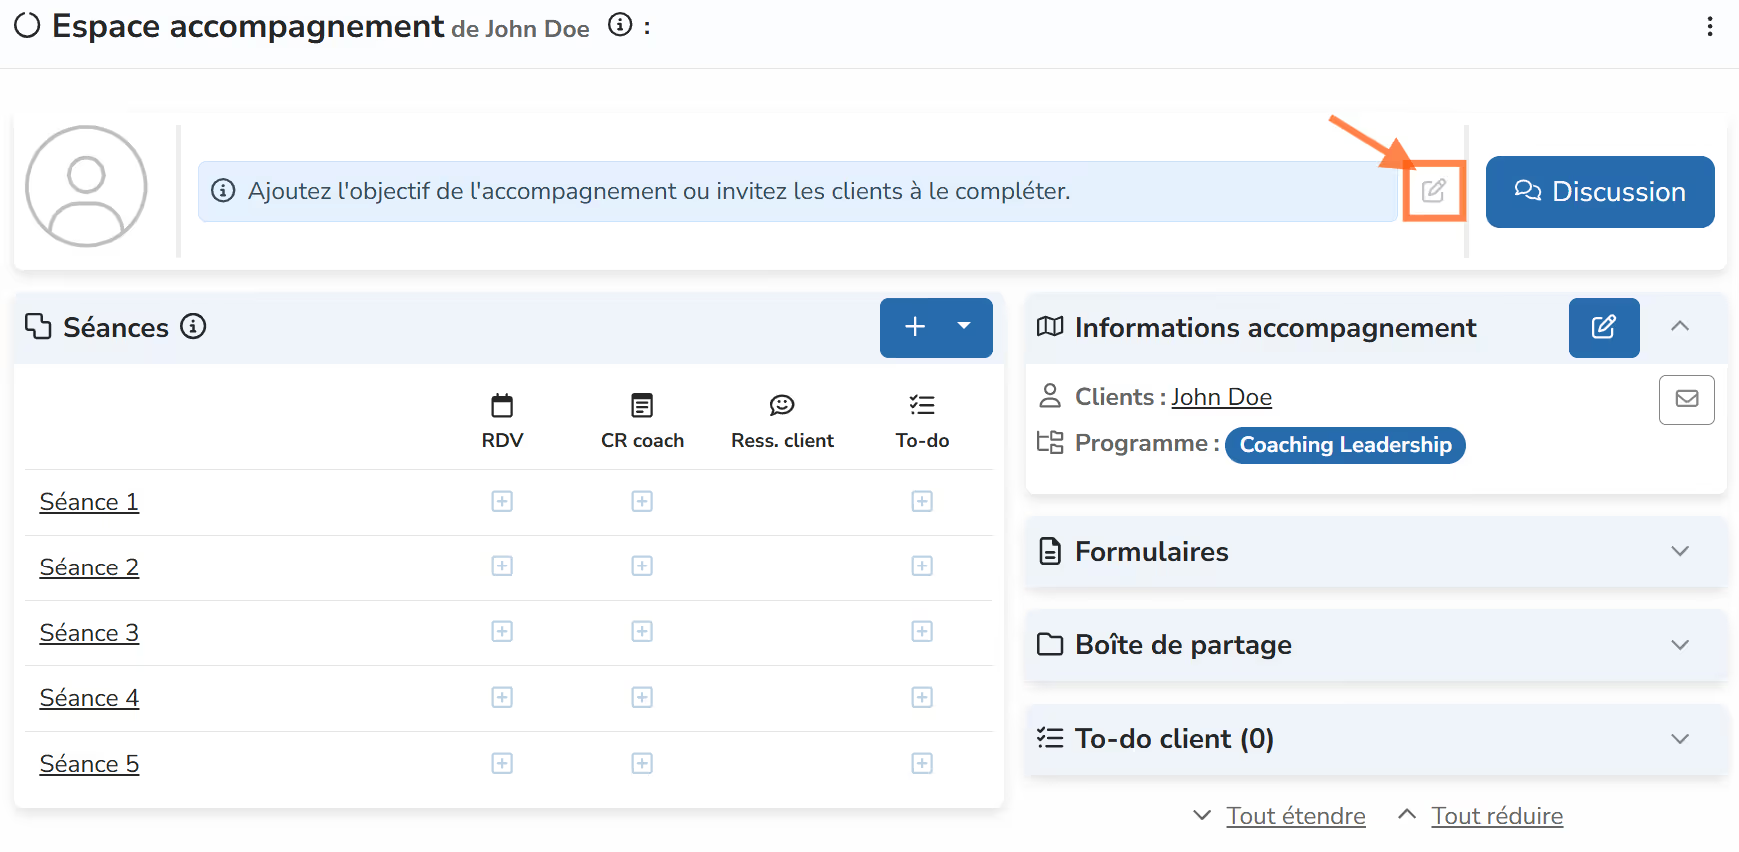
Here I am in the coaching engagement space.
To start, I can edit the objective of this engagement and enter something like "Discover Follow Lab".
2. Add a session and enter a description
Sessions may already be present in the coaching engagement space (depending on the minimum number of sessions I set for my program). I click on a session to view all details.
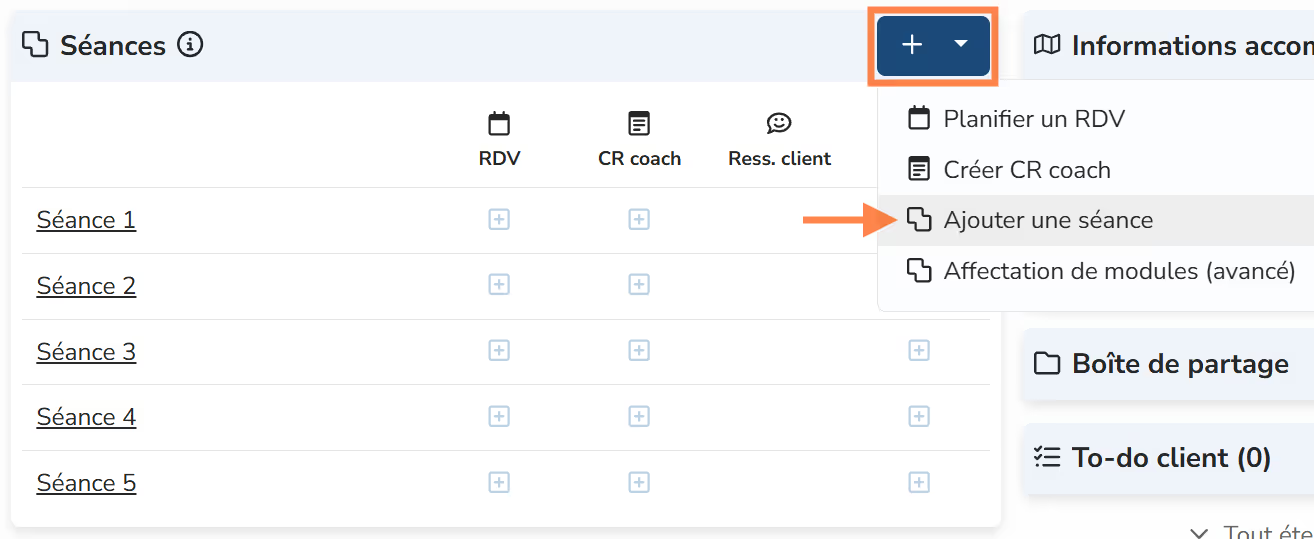
If I don't have a default session, or if I want to, I can add a session:
I click the + button
add a session
I enter a name for my session (e.g. Session 1, Discovery, Initial assessment, etc.)
save and close
I have all the session details in front of me.
I can enter text for description and instructions for this session.
I can also add confidential notes that my client will not see.
These notes will be visible to my collaborators if I choose to give them access to this engagement.
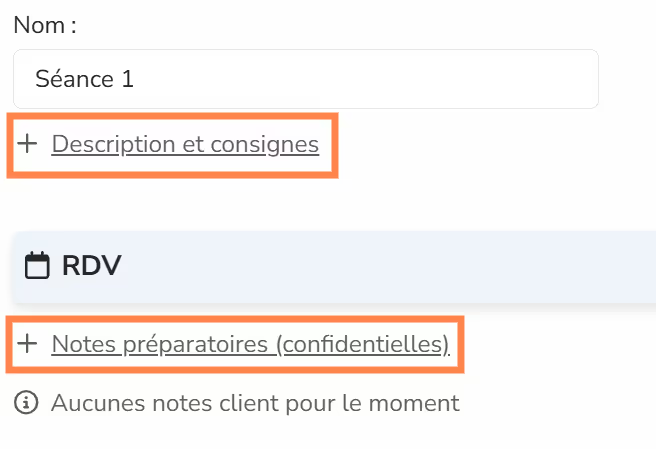
The client also has a notes area. This space can be used to prepare for the session and/or record notes after the session.
3. Schedule an appointment
From a session, in the Appointments section, I click the + button.
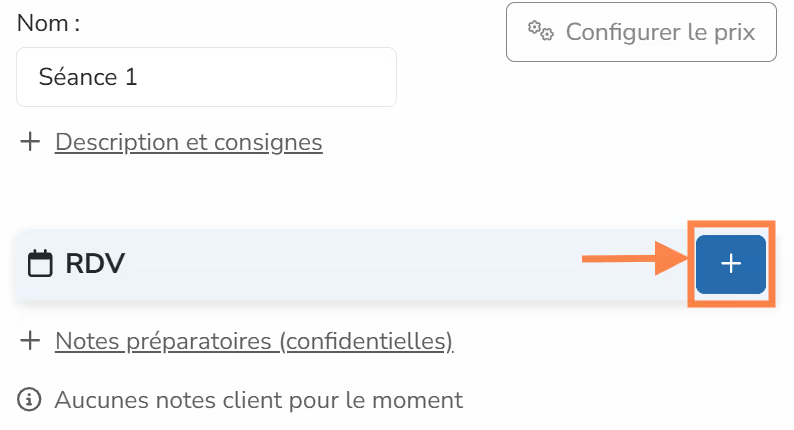
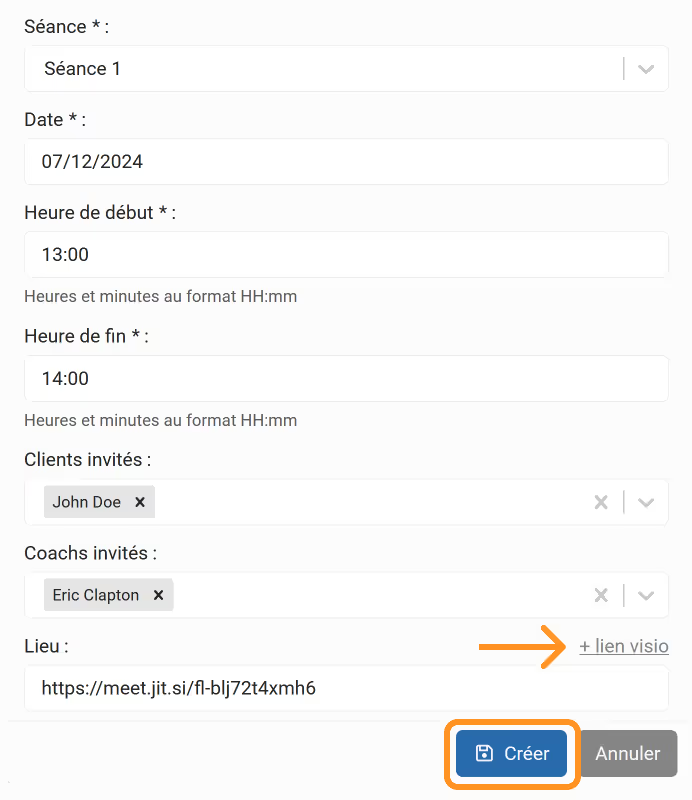
I can then define:
- the date of the appointment
- the start and end time
- I can add a location (physical or virtual)
Tip: The (+ video link) button automatically generates a link for the Jitsi Meet video conferencing app.
By pressing create, the appointment is added.
An email is automatically generated to inform my client (if I authorized email sending for this client).
It contains an invitation file, allowing them to add the appointment directly to their calendar.
If the appointment is modified in Follow Lab, you can choose whether to send a new email or not.
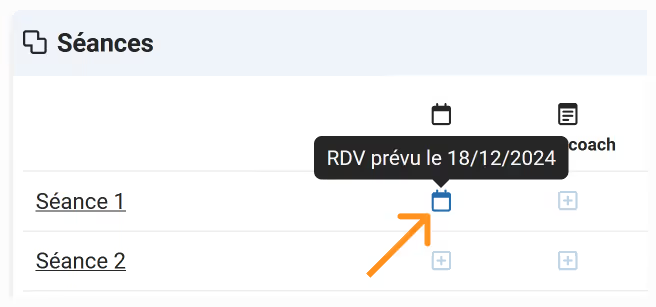
I can return to the coaching engagement space and see that my appointment is now visible.
The icon will be blue if the appointment is in the future, gray if it has passed.
When I hover over the icon, the date appears.
By clicking the icon, I can edit the appointment.
4. Add a session report
IMPORTANT
Session reports are the cornerstone of your follow-up.

After each session, we recommend systematically creating a session report, at minimum to record the date and duration of each appointment.
This lets you keep a record of all your coaching time and easily obtain your time tracking.
From a session, in the Coach report section, I press the + button.
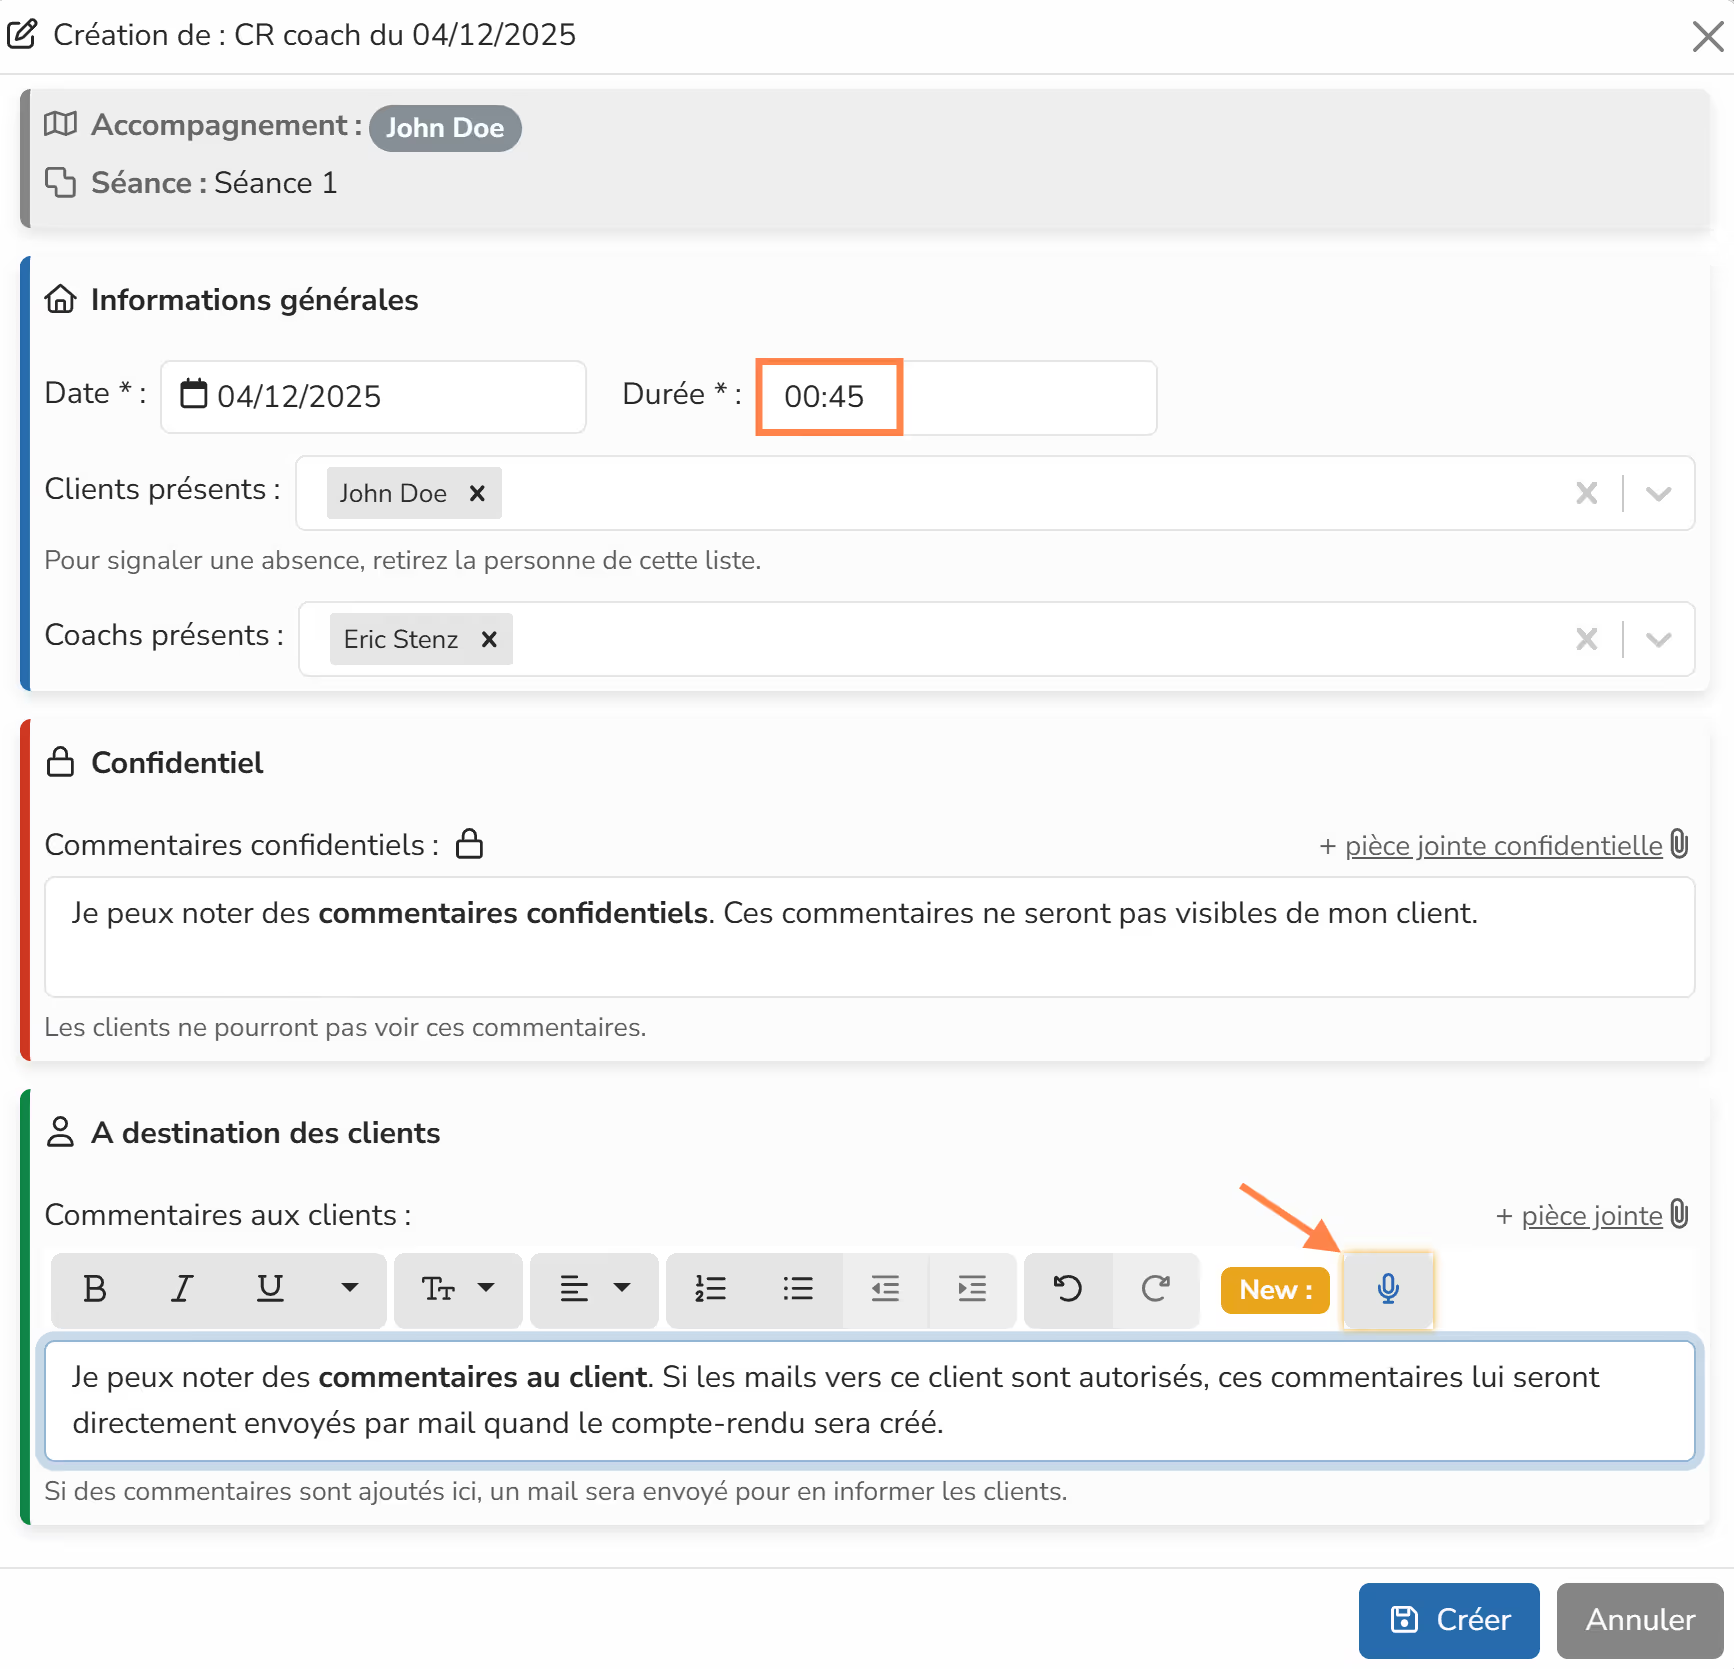
I notice that the date and duration are prefilled, based on what I selected when scheduling the appointment.
I can adjust them to indicate the actual duration.
I can write confidential comments. They will not be visible to my client.
I can add comments to the client, who will then be automatically notified by email (if emails are authorized for this client).
Tip: I can use voice input to go faster (especially on mobile)!
It works on all browsers, except Firefox for now.
5. Add a client to-do
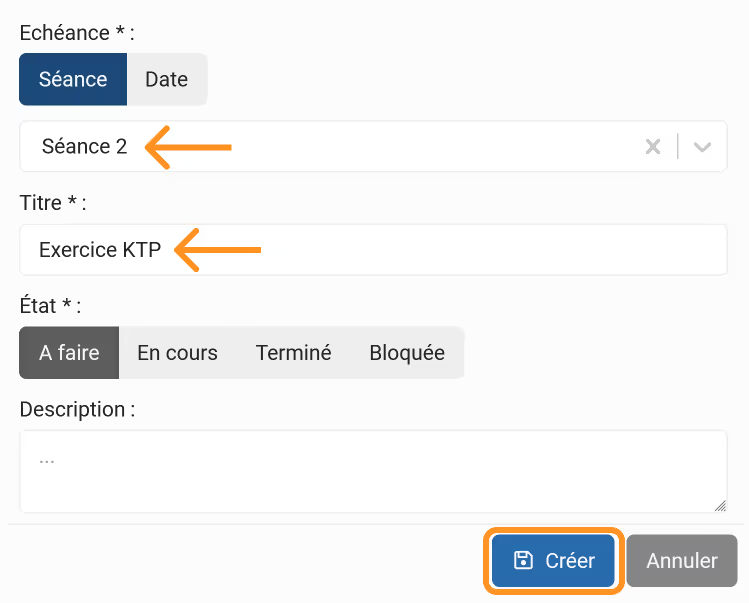
In the "Client to-do" section, I click the + button to add a task or exercise to complete.

If several sessions are already listed in the coaching engagement space, I can change the due date and select another session as the deadline.
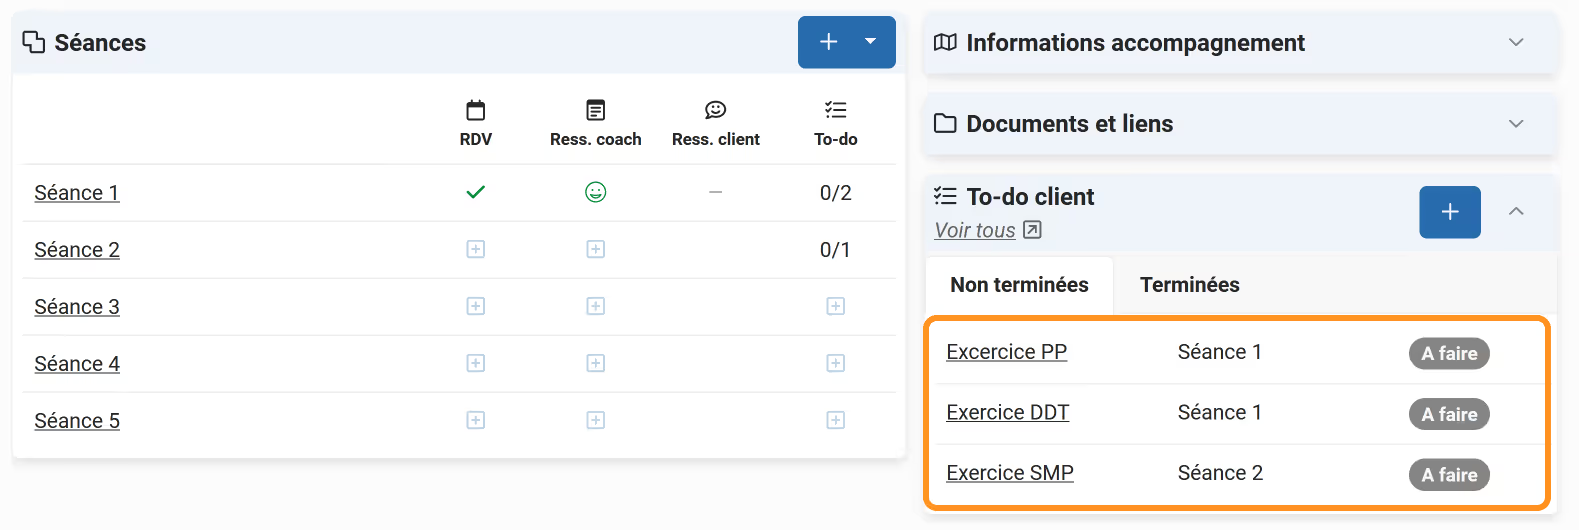
When I return to the coaching engagement space, I can expand the Client to-do section.
All client to-dos will be listed here, regardless of their due dates.
6. Share a link or document
In the sharing box section, I click the + button and select Link.
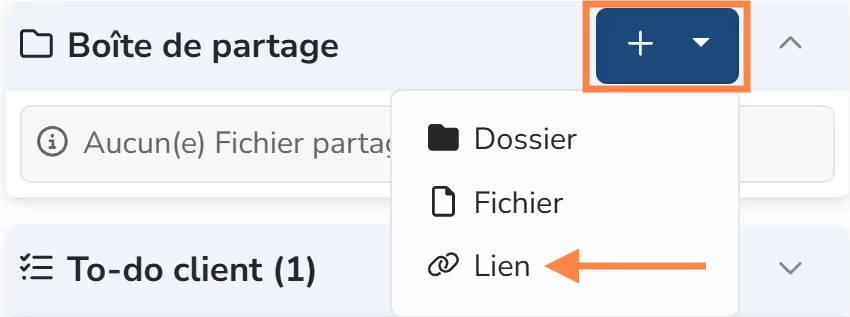
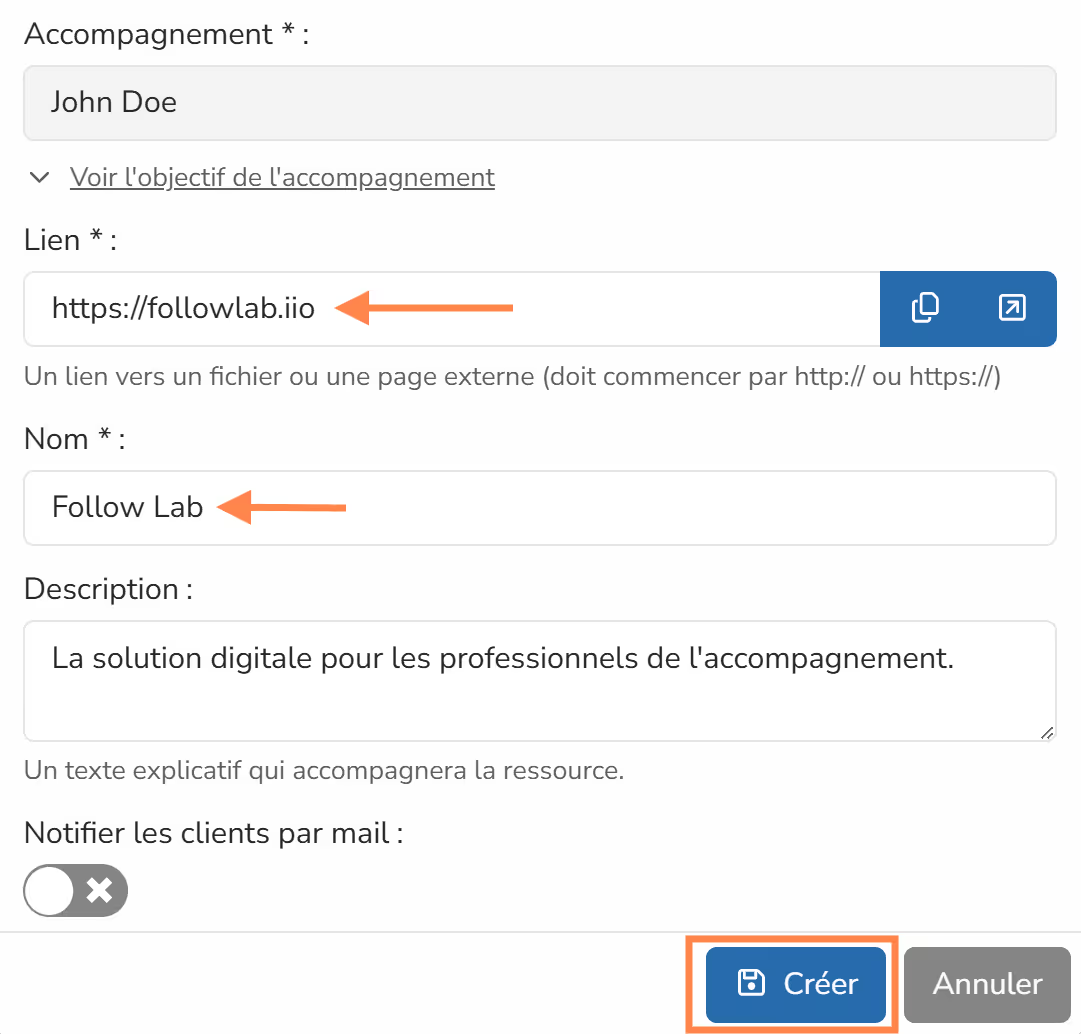
I enter my link (for example: https://www.followlab.io), its name ("Follow Lab"), and create.
- I can also share files.
- Documents and links can be organized in folders and subfolders.
- My clients can also add items to this sharing box.
7. Add a form
In the forms section, I click ⋮ and select "add a form" then "create a free template and associate it with this engagement".
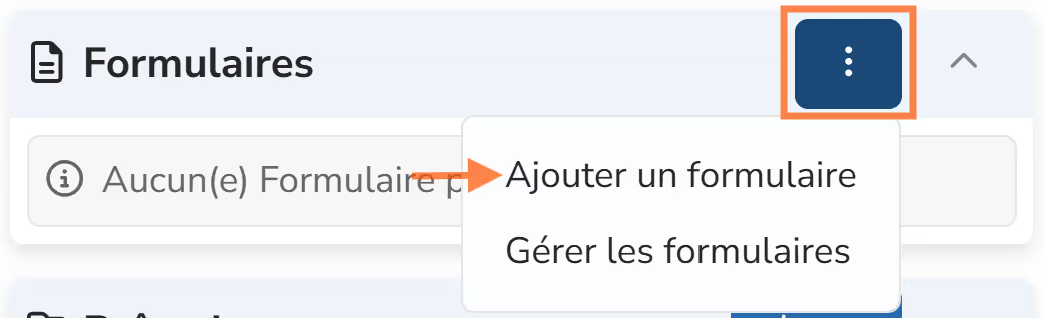
I configure my form with as many questions (fields) as I want (minimum 1).
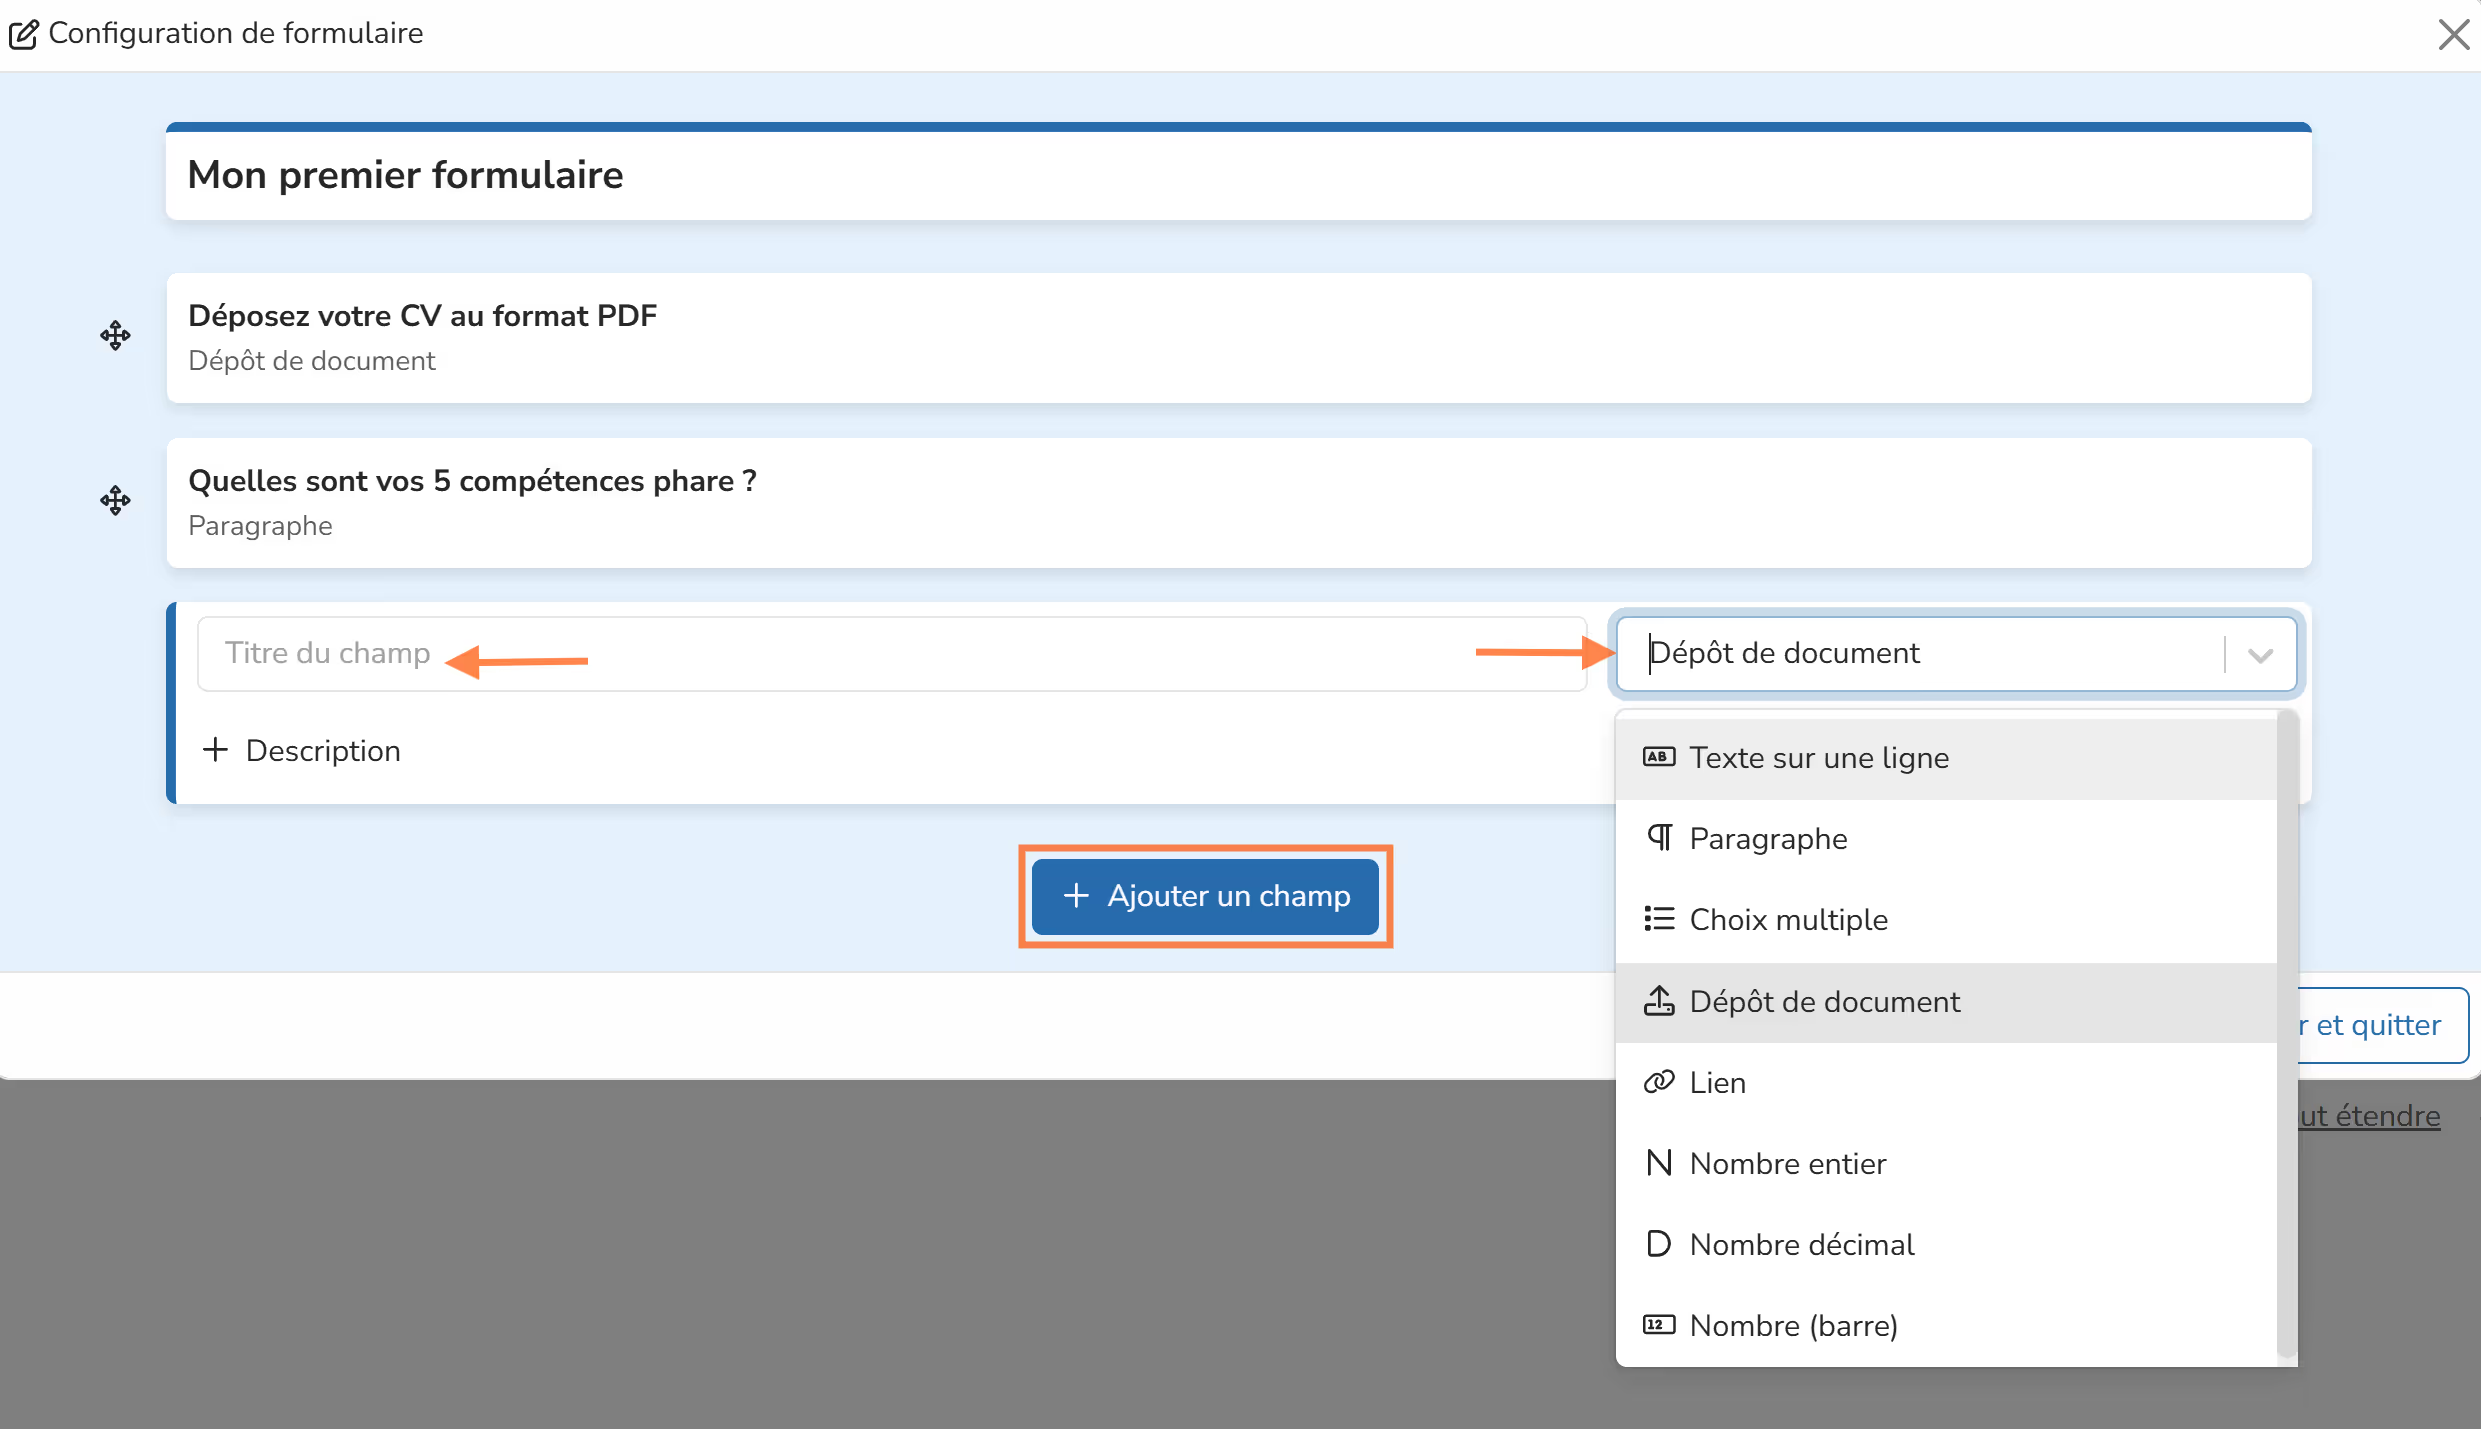
For each field, I determine the expected response format.
This can be:
- text
- a dropdown list whose options I configure
- a number scale
- a document to upload
- a link to insert
- etc.
Forms have many possible uses: positioning or satisfaction questionnaires, reflection canvases, upload areas for key and essential documents (contracts), etc.
This form we just created can later be reused for other engagements. Over time, you can build your Form library!
8. Write in the discussion space
From the coaching engagement space, I can use the discussion space rather than sending an email or WhatsApp message.
If a client writes to me, I will be notified of their message by a red dot on the notification bell.
Every morning, a notification email informs me of unread messages.
The same applies to my clients.
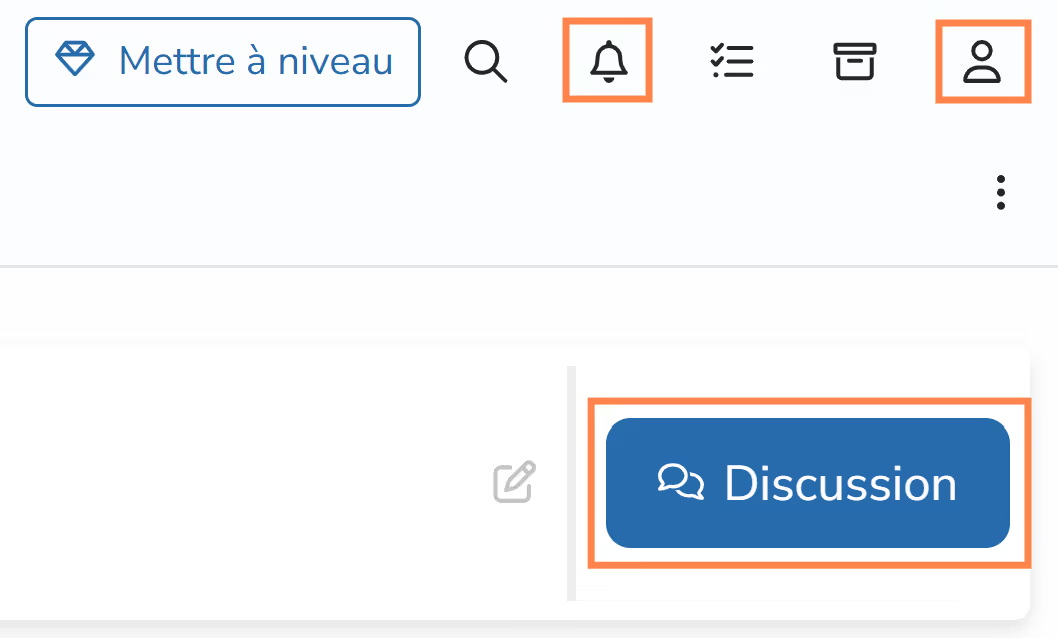
I notice my photo is missing! I close the discussion, click the icon at the top right, and quickly add one!
9. What does my client see when they log in?
A client only has access to their coaching engagement space.
From the coaching engagement space they can:
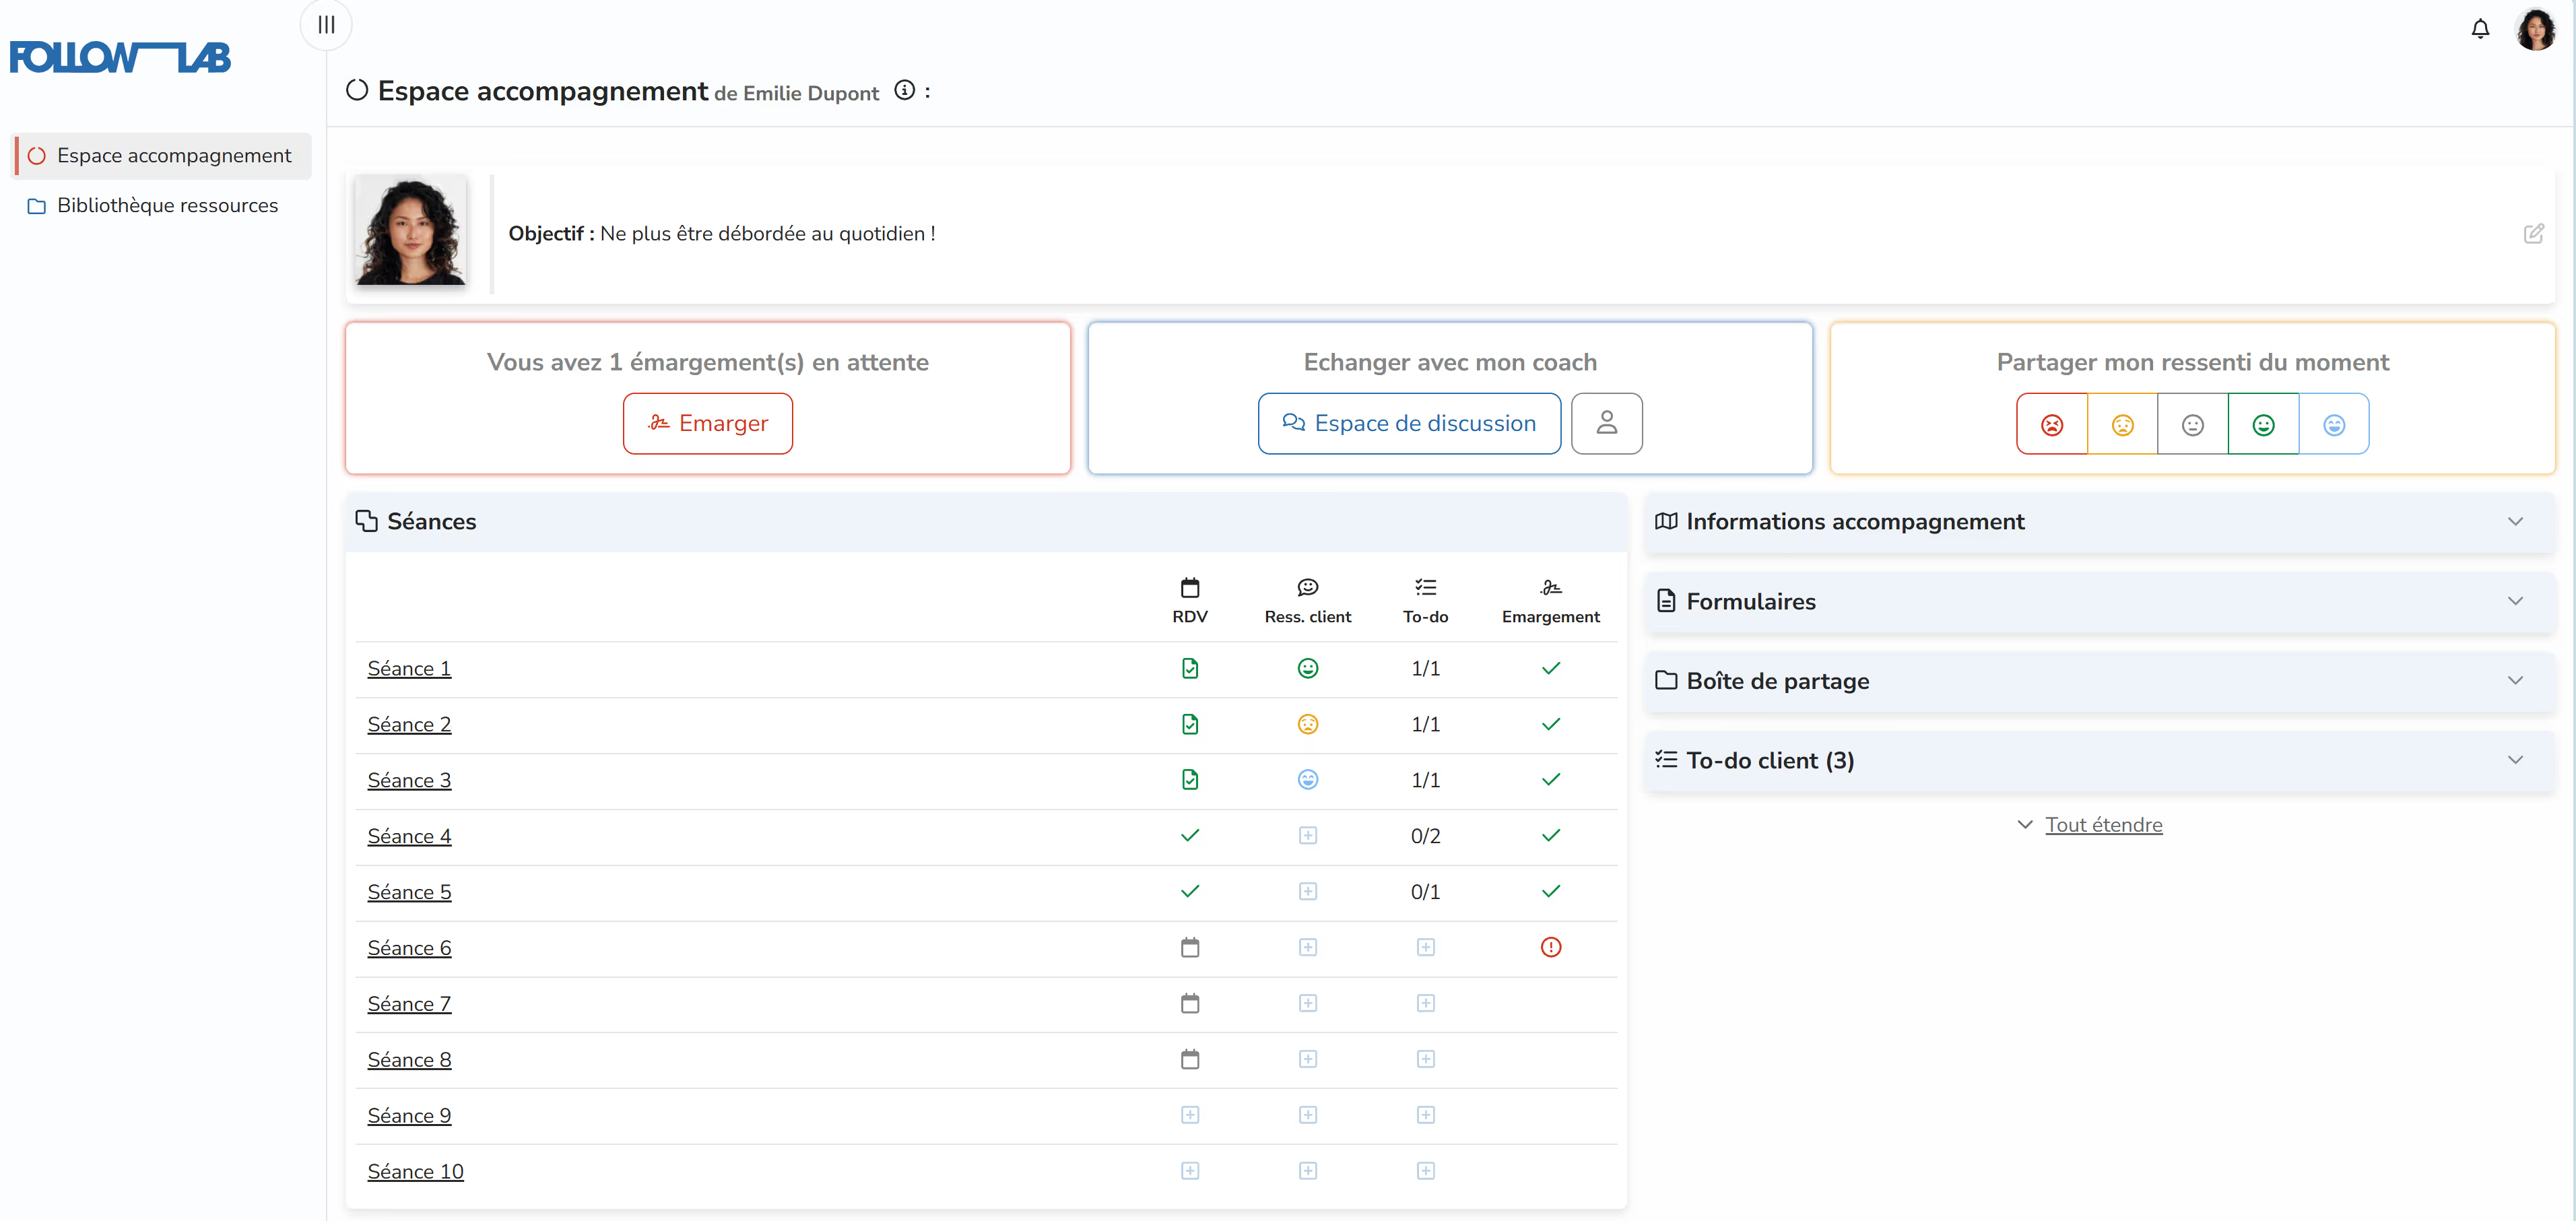
- view and edit the objectives of their engagement
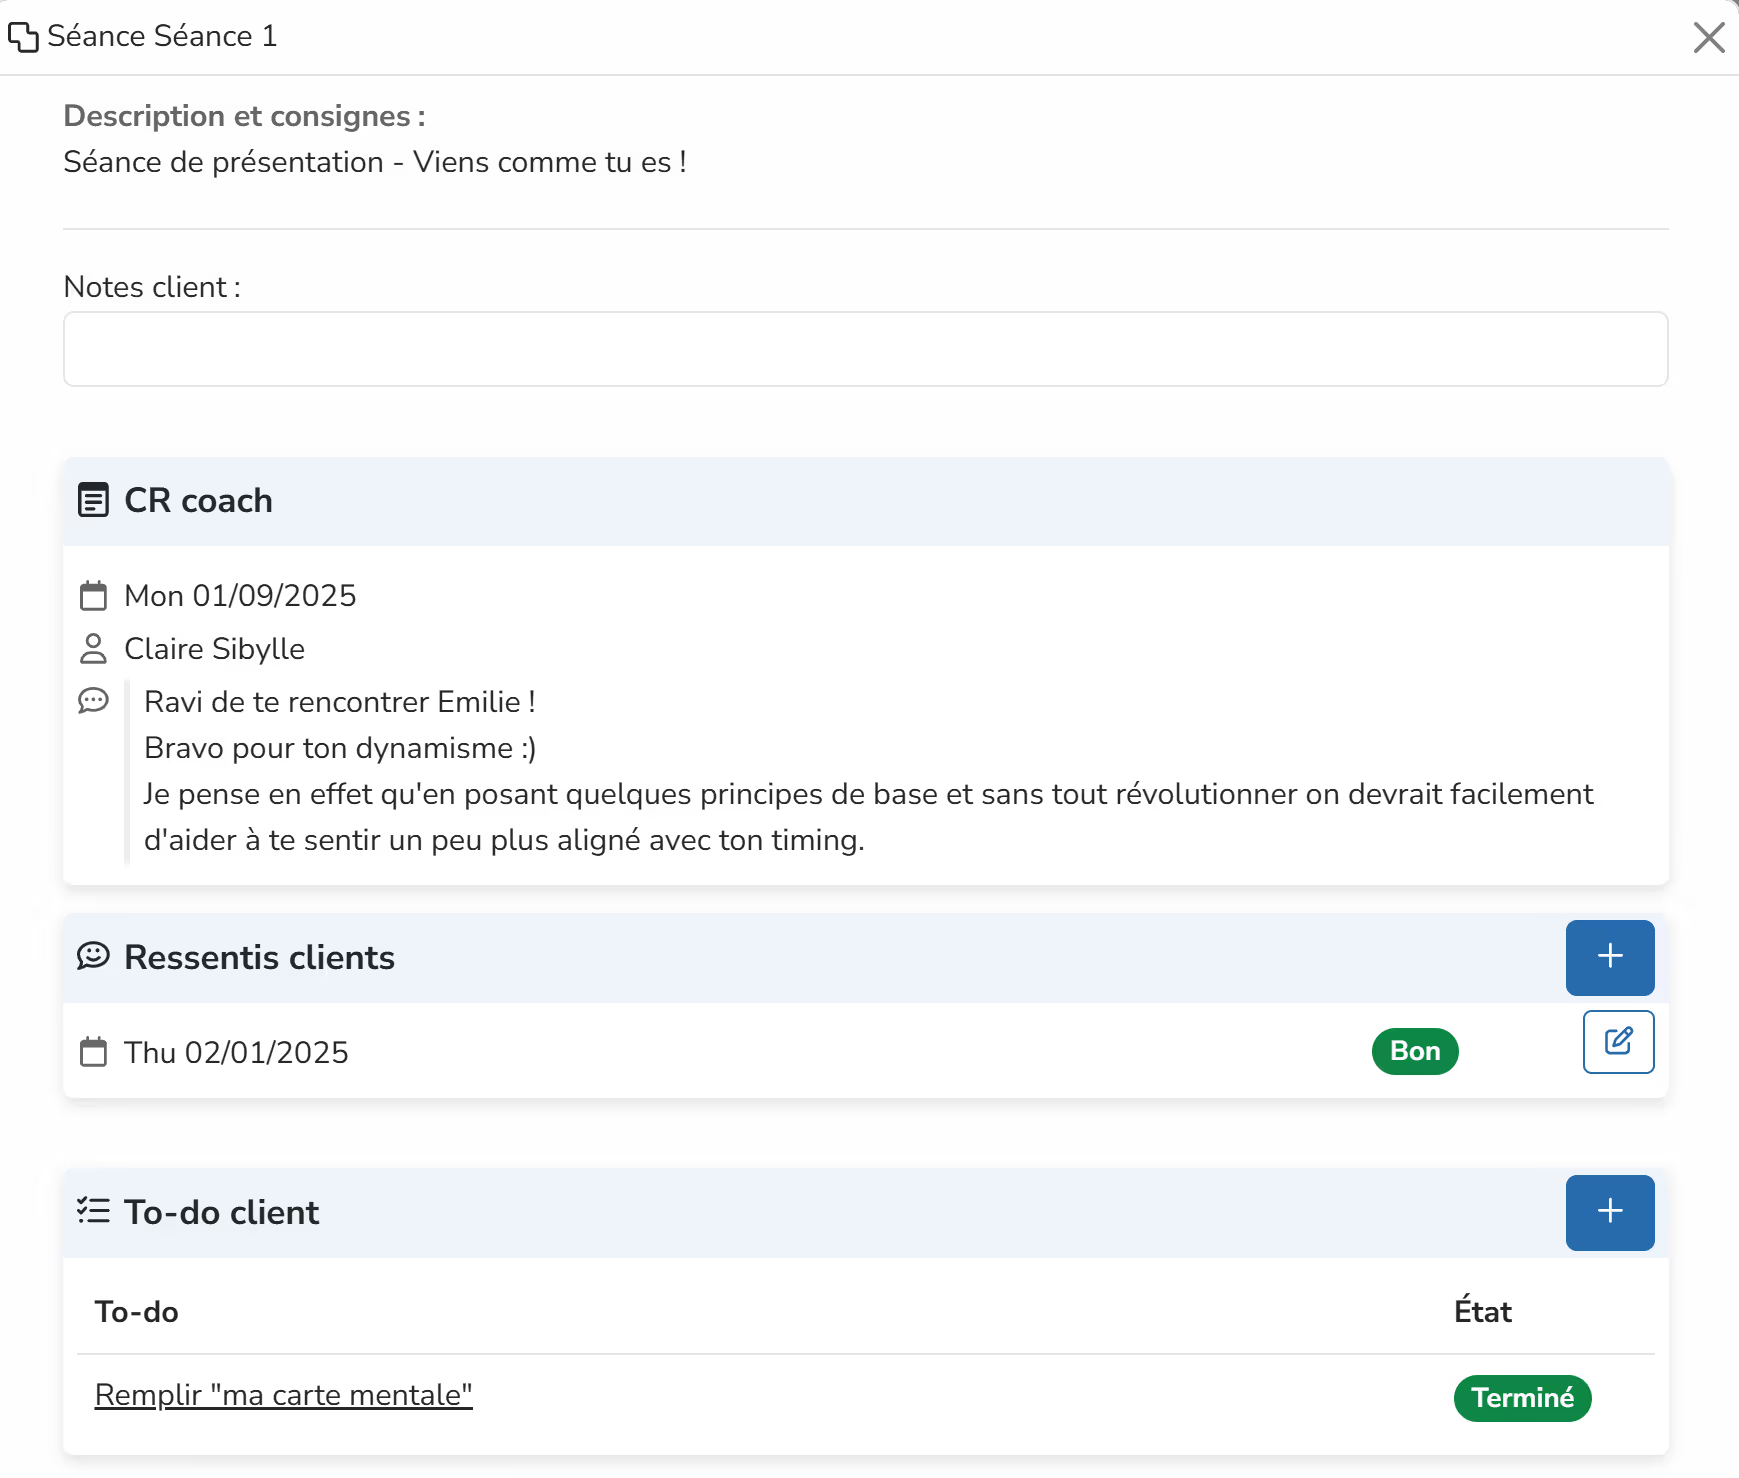
- view sessions, descriptions & instructions, and add their client notes
- view scheduled appointments (by default they cannot edit them, but you can enable this option from the "configuration" page)
- share their feelings
- view and edit their to-do list
- view, download, or upload items in their sharing box
- view and complete their forms
- browse the resource library (only items for which access is authorized)
- view comments to the client in your session reports (but not the confidential part, nor the feelings)
- write to you in the discussion space
Provided their notifications are enabled, a client is notified when:
- an appointment is scheduled / modified / canceled
- a client comment is written in one of your session reports
- you check the notification option when adding an item to the sharing box or resource library
- you write in the discussion space (notification once per day only, in the morning, if there are unread messages)
If I do not want my client to have a Follow Lab account, I can add an engagement in their name without adding them to the user list. This is explained in the "Going further" section.
Step 3: Structure and deploy my programs (5 min)
1. Configure a program
I go to the Programs page and click create.
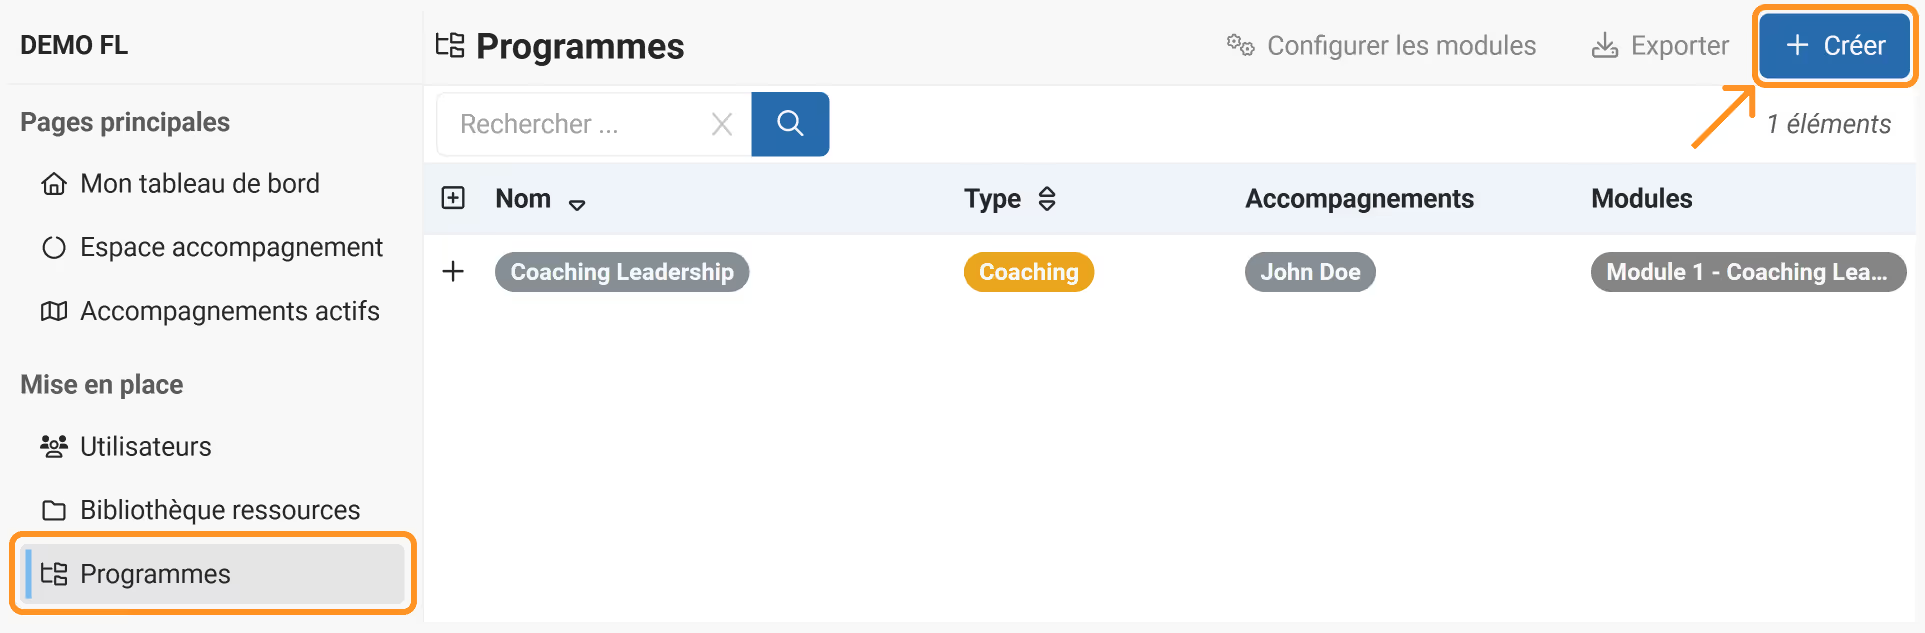
I enter:
- the name of my program
- the type of program (coaching, training, consulting)
- for the module, I leave the default choice: new module (advanced management will be covered later)
- I choose the minimum number of sessions
- I create
IMPORTANT
If I choose 5 minimum sessions, for example.
Every engagement created for this program will have 5 sessions by default.
It will be possible to add additional sessions on a case-by-case basis (see step 2.1).
However, these default sessions cannot easily be removed.
If you want no session added by default, enter 0.
I double-click the program I just added to access the Program sheet.
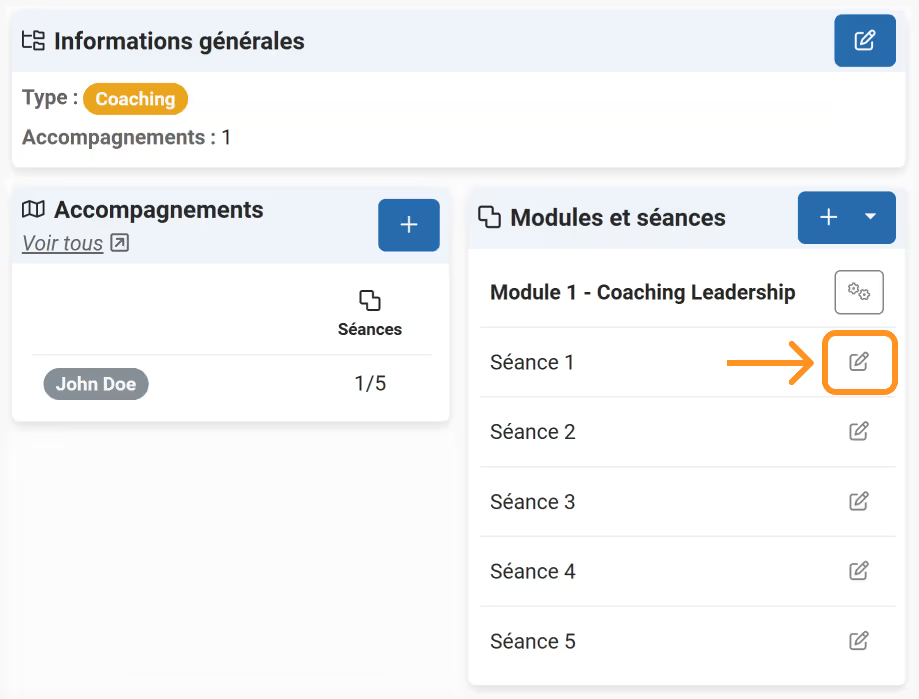
In the module and sessions section, I see the default sessions.
I can change their names and add descriptions and instructions.
This way, every engagement will automatically have these sessions, with adapted names and prefilled instructions.
2. Organize my resource library
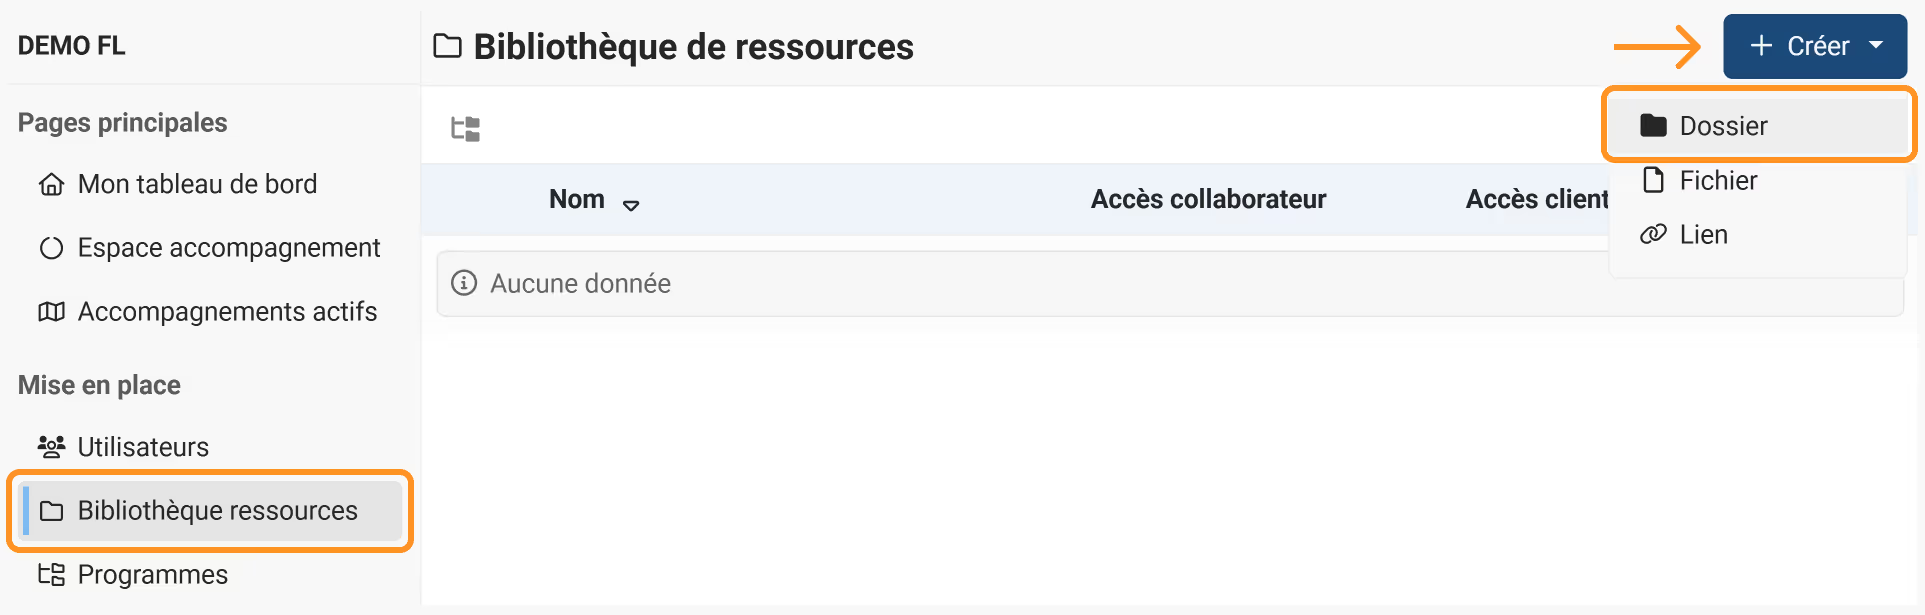
I go to the Resource library page and click create, then select folder.
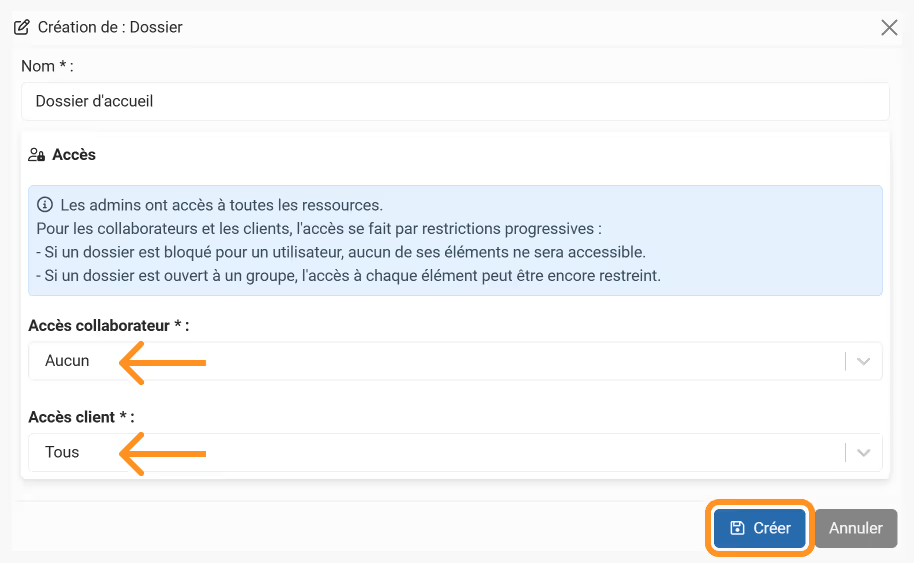
I can name the folder "welcome folder", for example.
If I have no collaborator, I can choose "none" for collaborator access.
I finally make the folder available to all clients by choosing "all".
I click the folder, select the create button again, and now choose file.
I can drag and drop a file of my choice and rename it. For example "Engagement charter".
In client access, I choose by program and select the program of my choice.
Only clients with an engagement in this program will be able to access the resource.
I notice that access works like a funnel: since no collaborator had access to the welcome folder, I cannot give a collaborator access to the engagement charter.
Last exercise: create a link resource and give client access by engagement.
With this method, I can distribute access on a case-by-case basis:
- I create a resource
- in the client access section, I choose "by engagement"
- I select the name of the target engagement
3. Organize my form library
In the "administration" menu section I go to the Configuration page and select Form library.
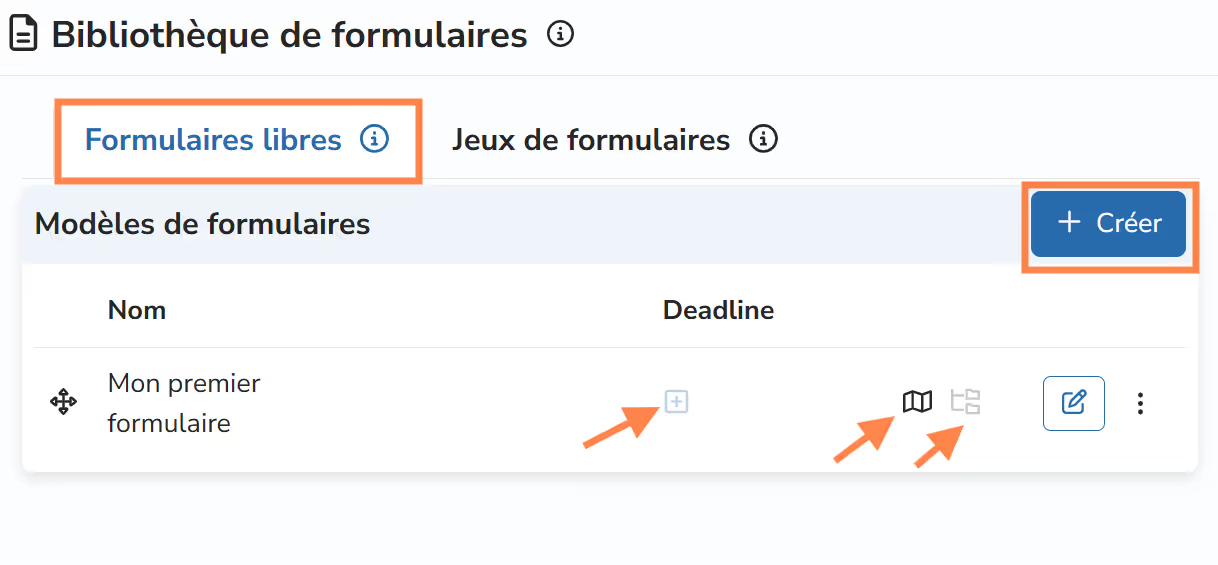
I see two tabs:
- free forms, which I can add directly to a program or an engagement
- form sets, which let me add all the deliverables they contain in one action
I can create as many forms as I want.
For each form / form set, I see which engagements and programs it is linked to.
If I add a deadline, it will apply to all related engagements. I can adjust the deadline on a case-by-case basis from each coaching engagement space.
To add a form from my library to one of my engagements, I go to the coaching engagement space > add a form.
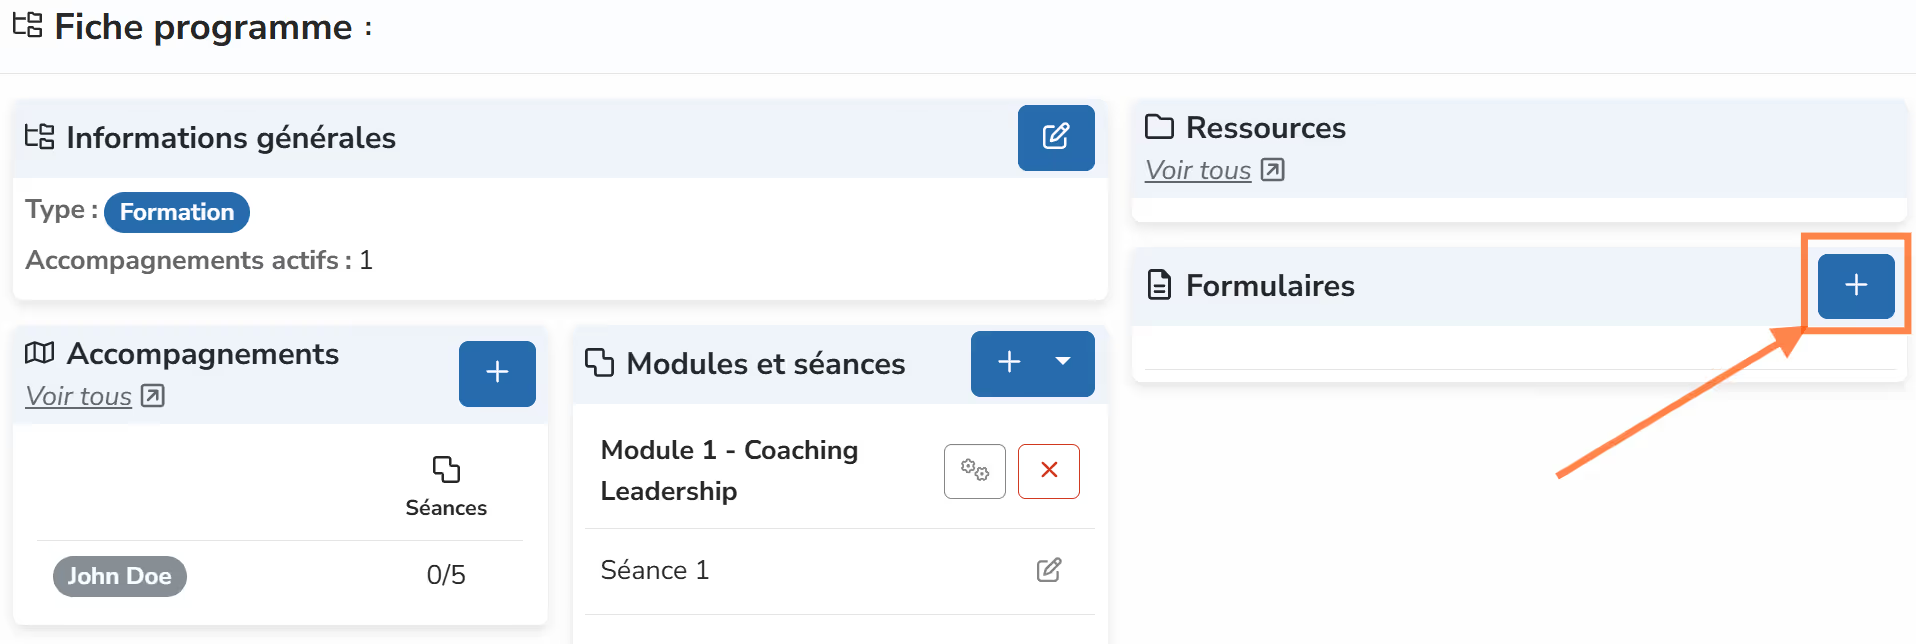
To add a form from my library to a program, I go to the program sheet. In the "form" section, I click +. The form will be added to all engagements in this program.
Step 4: Manage my activity (5 min)
1. Explore the different dashboards
In the menu, a "supervision" section lets me access different dashboards.
On each dashboard, a search function and quick filters let me quickly target relevant information.
The session report overview gives me a quick count of coaching hours delivered.
2. Pin an item
In any dashboard, when I click the button at the end of the row, I can pin the selected item.
The pin is added to my personal to-do list.
I can view my to-do list at any time, reorder it, and most importantly mark my to-dos as completed.
3. Export my data
On the various overview pages, an "export" button lets me collect my data in CSV format (Excel).
Once the export is generated, I go to the export page to download it.

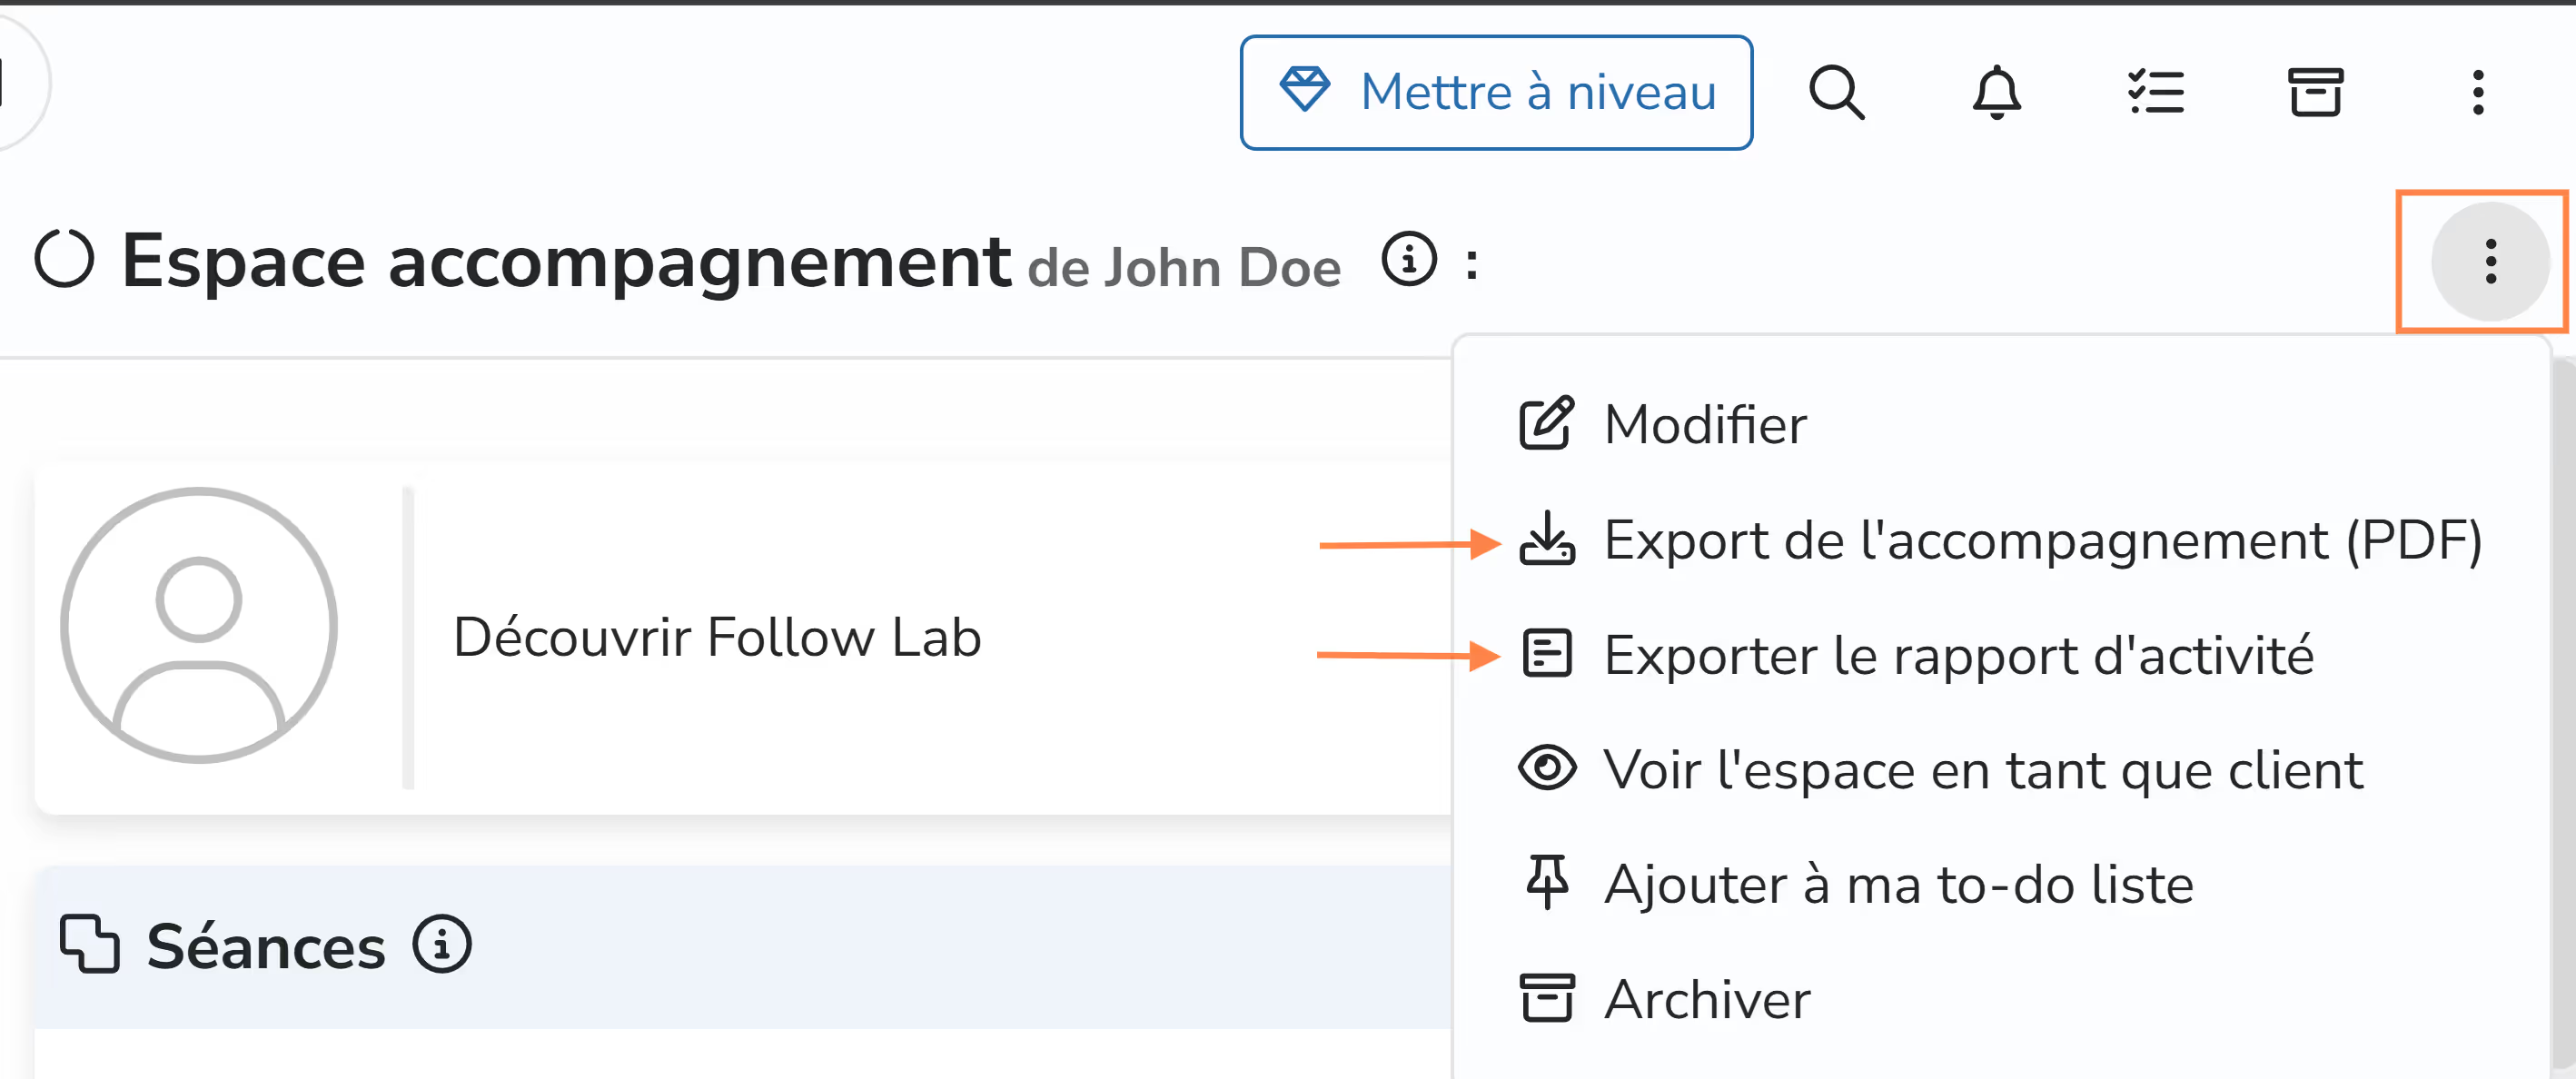
From the coaching engagement space, I can also generate PDF files, either with all data or a simple activity report (or attendance sheet).
Going further
1. Upgrade at the end of my free trial
I click upgrade and select the plan of my choice. Monthly billing will be set up using the credit card on file. I can change or cancel my subscription at any time.
2. Use the referral program
I click the icon at the top right of the interface (or my profile photo if set) and select the referral tab.
My referral code then appears.
I can share this code with people around me.
If a referred person subscribes, they get 1 month FREE, and so do I!
3. Invite a client and authorize email sending
If I added a client on Follow Lab but did not want to send an invitation or enable emails, I can do so later.
To do this, I go to the Users page.
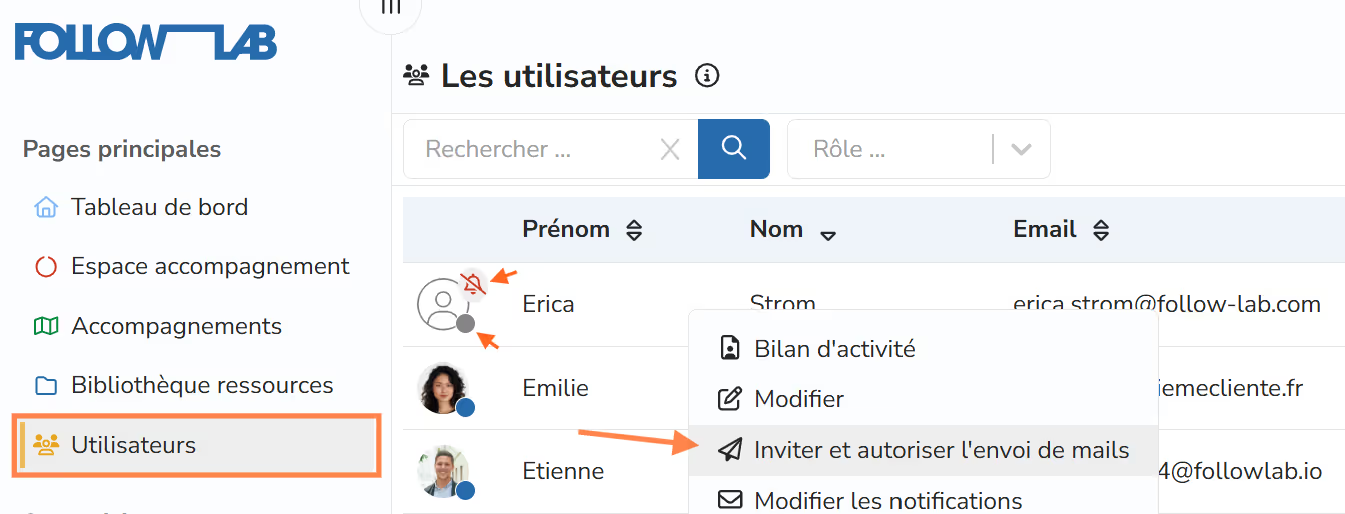
I notice my new client is marked with a gray badge, meaning they have not been invited.
This badge turns yellow once the invitation is sent, and blue after the client's first login.
The crossed-out red bell means they will not receive any Follow Lab notifications.
I click my client's name, then the Invite and authorize email sending button.
An invitation email is then sent.
4. Add a collaborator
If my plan allows it, I can add a colleague to my Follow Lab workspace.
I go to the Users page and click Create.
If I give them the ADMIN role, this colleague will have the same permissions as me (except upgrading).
If I give them the COLLABORATOR role, this colleague will only see engagements I give them access to, and will not be able to administer the platform (create engagements, clients, services, etc.).
A collaborator can get systematic access to all engagements by being marked omniscient.
5. Archive an engagement
From the active engagements page, I choose an engagement and click the button at the end of the row, then "archive".
I select the archive folder.
From this point, the engagement is no longer visible by default.
My client can still find their information there, but can no longer add or modify anything.
To view it, I click the archive icon at the top right of the interface, then view.
6. Multiple engagements for one client
If a client is followed under several programs, they will have several engagements.
We then recommend renaming their engagements by adding a brief suffix indicating the program.
Example: if John Doe is followed in my Professional Coaching program and my Public Speaking program.
John Doe - CoachingPro
John Doe - PublicSpeaking
7. Engagement without client access
If you want to track an engagement on Follow Lab without giving the client access or generating any notifications, you can create an engagement (see step 1.1) and choose the "no client attached for now" option.
No user account will be created for the client, and they will not receive notifications.
8. One engagement for several clients
You create an engagement for one person, as usual.
Then from the users page, you create a new client, select the "existing engagement" option, and choose the engagement you want to add them to.
This lets you set up an engagement for several people (for example a couple, a minor and their parent, a small team).
9. Advanced module and session management
As a reminder, a module is a list of preconfigured sessions.
In standard management, each program is associated with one module, no more and no less, and modules are not shared from one program to another.
Advanced management lets you configure your engagements more precisely:
- You can associate several modules with one program
- You can associate one module with several programs
- You can add a module directly to an engagement, independently of its program
ATTENTION
It is important to keep a clear view of your modules and how they are used: when you modify/delete a default session in a module, the change/deletion applies to ALL engagements linked to that module.
Manage versions:
Over the course of my work, I will evolve my modules.
But given the message above, modifying modules in use is not without consequences...
Am I doomed to keep my modules identical forever?
Fortunately not!
I can change a module for all future engagements without modifying archived engagements and engagements in progress.
Suppose I want to modify the "CPro" module, attached to the coachingPro program.
- I rename the module: "CPro ( V1)"
- I duplicate module V1 and name the copy: "CPro ( V2)"
- I modify module V2 as much as I want.
- In the coaching Pro program module list, I replace module V1 with V2
- I archive module V1